 "The
Ice Cream Man"
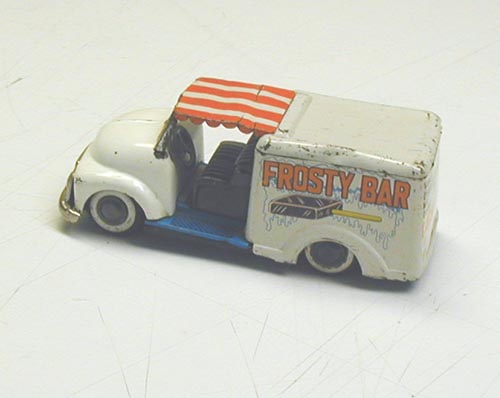
I bought this tin
ice cream truck last year and have been gathering
other objects and developing the story behind the
painting. Nothing was more exciting during the
summer months of vacation than to hear the music
of the ice cream man in the distance. Our ice
cream man was named Herbie, and if you timed it
just right when you were buying your ice cream
from him, he would take the empty cardboard box
that held the ice cream bars and pop it on top or
your head. The frost from the box would go down
your neck and make that 90 degree day feel real
cool. Not to mention that you were the 'chosen
one' that day, and that carried a lot of weight
in my neighborhood. This tin truck was the spark
for the inspiration that will soon become a
painting.
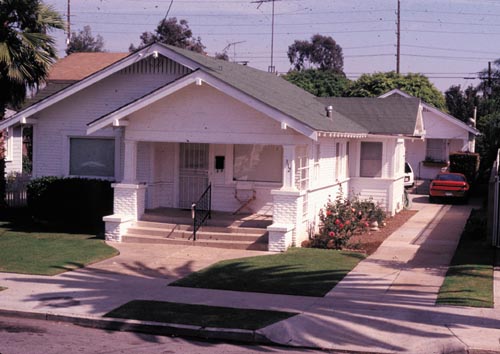
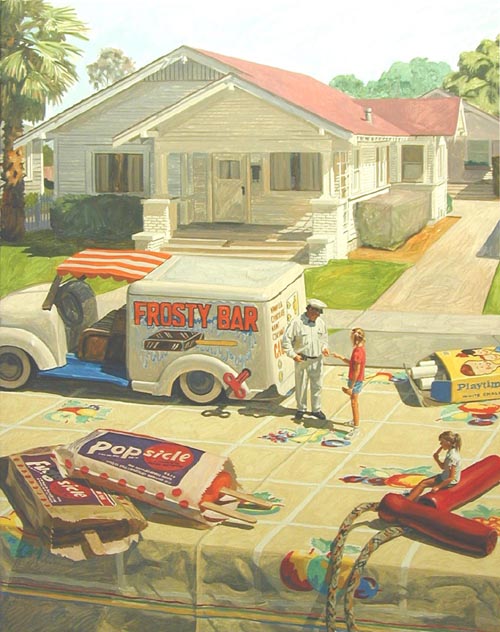
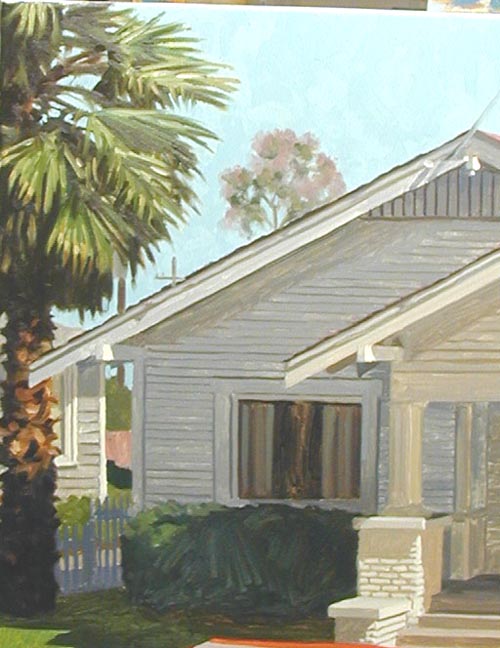
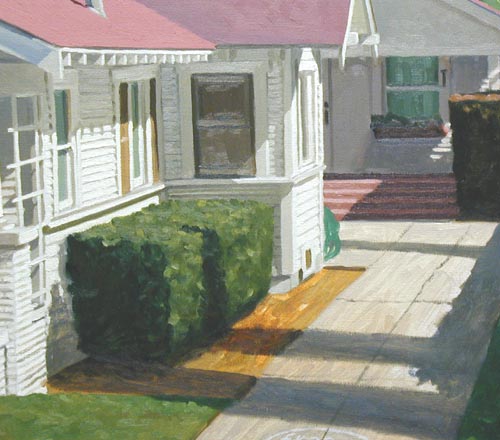
Here
is a photo I took a few years ago in Long Beach,
in the Belmont Heights area. Looks like my
grandma's house in Los Angeles that we lived in
for a short time when I was 4 years old. I am
envisioning the ice cream truck parked in front
of the house with the ice cream man handing a
Popsicle and a Fudgsicle to two small girls. The
girls had just been playing hopscotch and
jumprope.
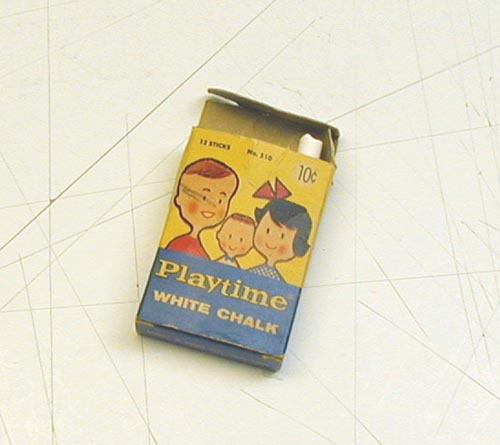
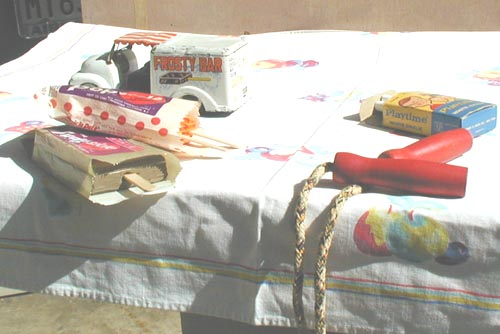
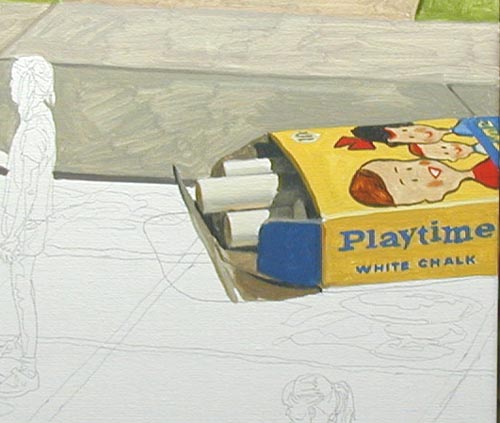
Here's
the box of chalk that I will use in the painting.
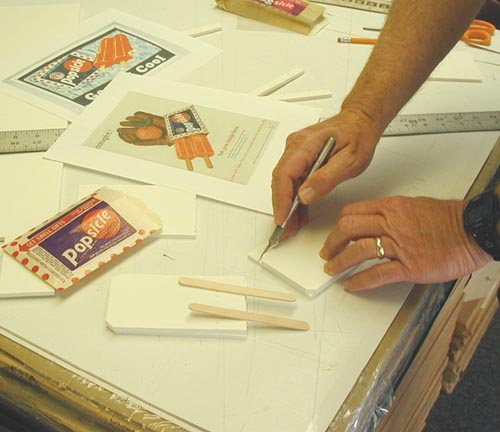
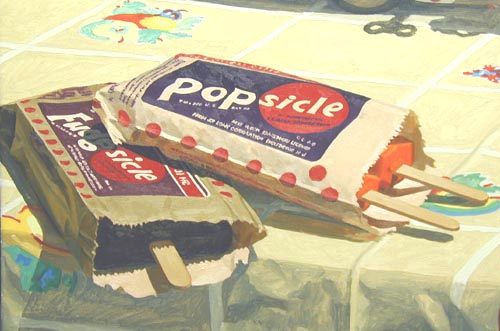
I
found an unused Popsicle and Fudgsicle wrapper
and had to make a couple of frozen treats out of
foamcore board to go in the wrappers.
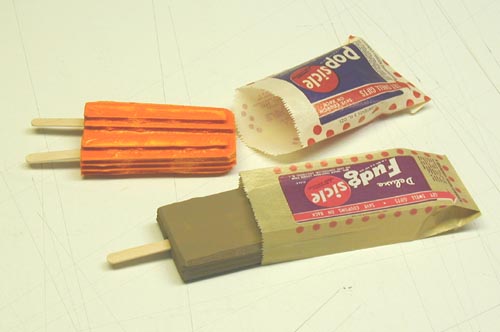
Here
they are, ready to go into the still life set up.
I am waiting for a vintage jumprope that I
purchased. It may be a week before it arrives...
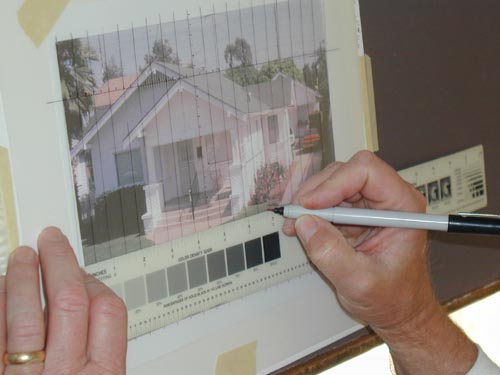
Although
I've found my three models for this painting,
Spring Break has sent my two youngest models on
vacation, delaying their photoshoot. I've decided
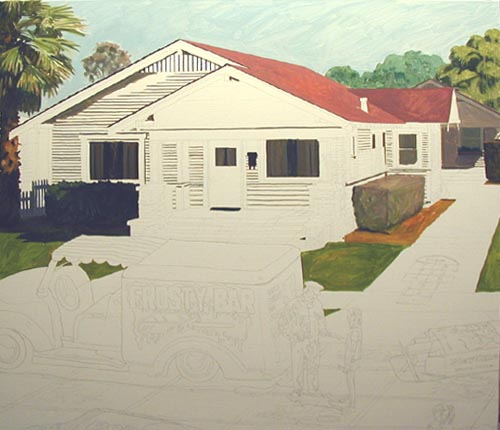
to begin the design of the image, placing the
house in the upper part of the canvas. I've been
contacted by a couple of high schools that use my
step-by-step pages in their art curriculum. They
would like to have a little more information for
their students as to how I draw the image on the
canvas. So here goes. With the house, I placed a
sheet of clear mylar over the photograph and made
my own gridlines.
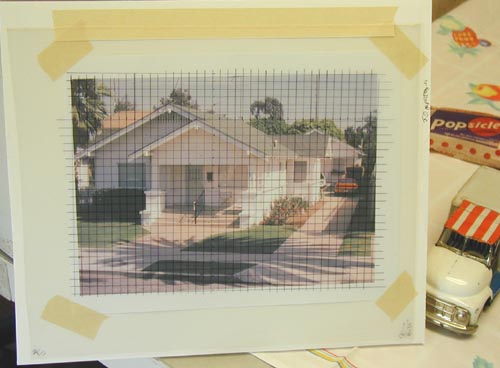
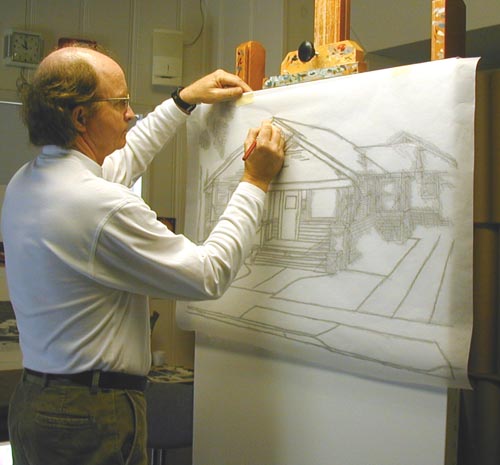
Here's
what it looks like finished. After I decided how
large I wanted the house to be on the canvas, I
drew corresponding gridlines on a sheet of white
chipboard. This is an old mural artist's
technique for scaling up a drawing onto a wall or
larger surface. By observing just where certain
parts of the house appear in each box formed by
the gridlines, I copy those areas into the
corresponding box on the chipboard.
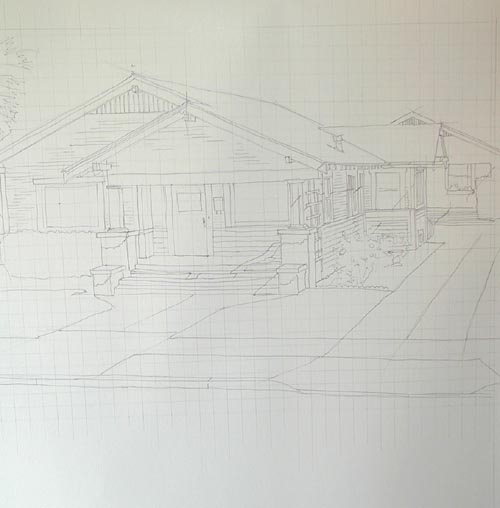
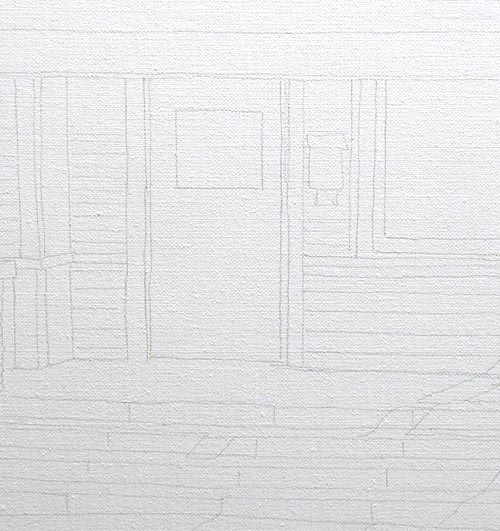
Here
you can see the chipboard with the grid lines and
the drawing of the house on it. I worked it all
out with pencil and then drew over it with a
black thin marker.
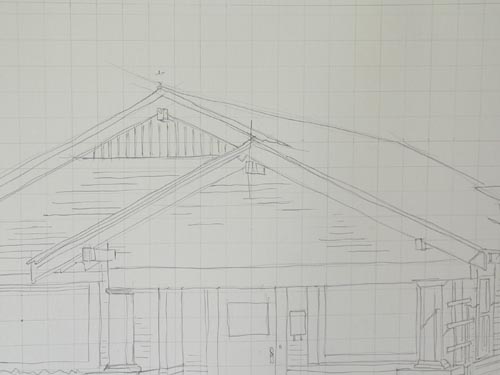
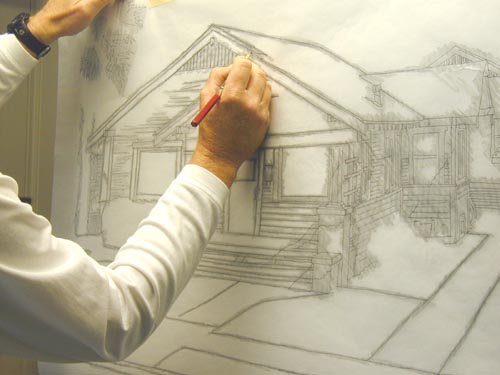
Here's
a close-up of the roof section. I drew this on
chipboard instead of directly on the canvas so
that I would still have the option of moving it
up and down, left and right on the canvas. In
order to get the drawing onto the canvas, I will
lay a large piece of tracing paper over the
drawing and trace the outline of the house onto
the tracing paper with the black marker.
Here
I am tracing the outline drawing with the tracing
paper and the marker.

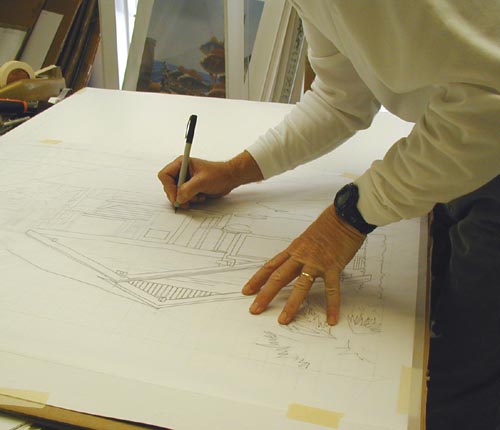
I'm
using a #2 pencil now, rubbing it on the backside
of the tracing paper.
With
the graphite on the back of the tracing paper, it
becomes carbon paper. I tape it to the canvas
and...
With
a 6H pencil, I retrace the outline, pressing the
graphite from the #2 pencil onto the canvas.
Here's
what the canvas looks like after transferring the
drawing onto it.
I've
had my props out in the sunshine today, moving
them around, trying to find a grouping that works
for the space I have allotted at the bottom of
the painting.
My
models are coming over to pose on Thursday. Hope
there is some sunshine...
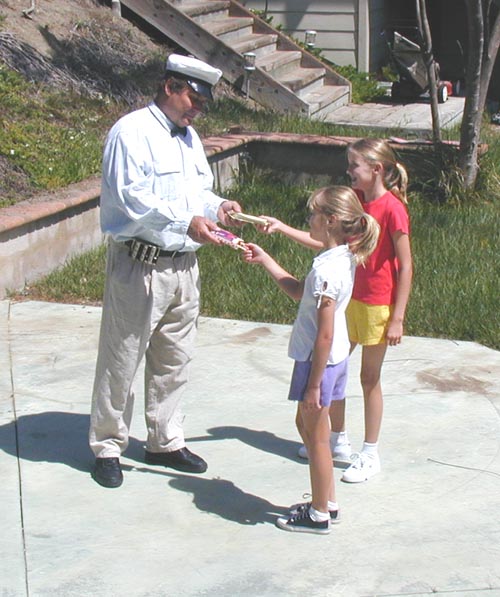
Well,
the sun was shining and so were the faces on the
models. Looks like I'll have plenty to work on
this week, positioning them into the painting... By the way,
Aria and Makenzie, (now a bit older) made the U.S. Olympic
women's water polo team and will compete in Rio in 2016.
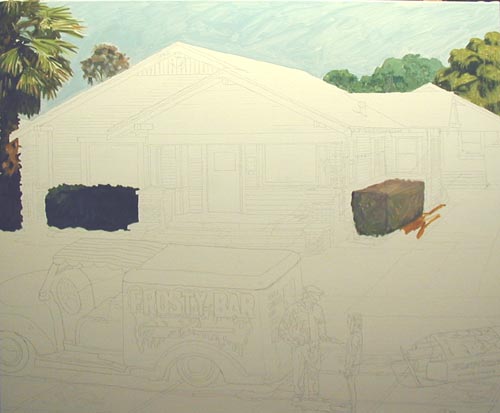
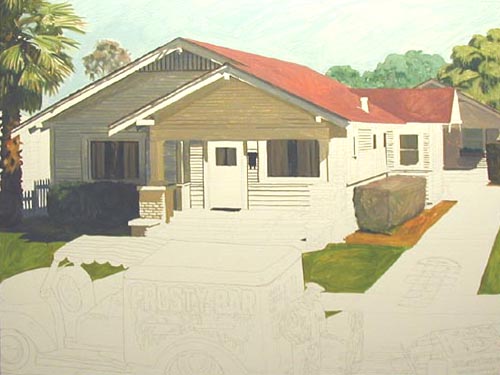
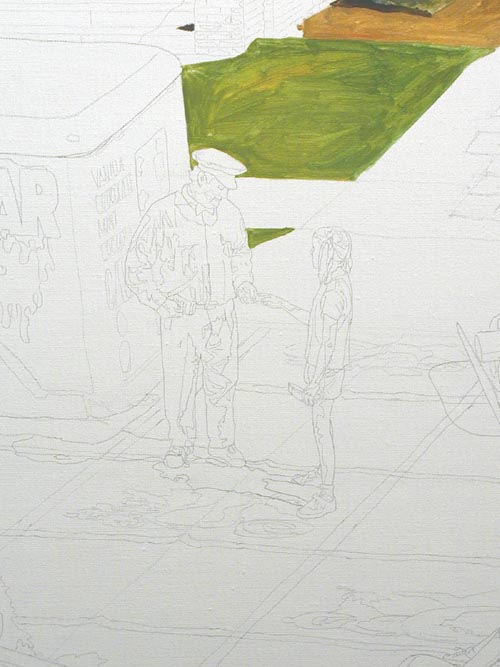
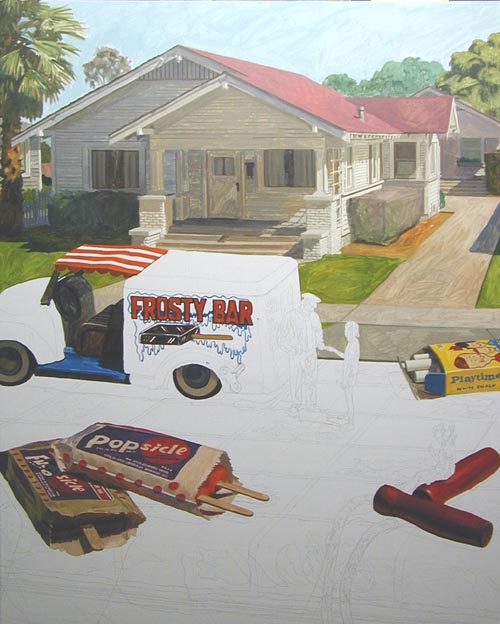
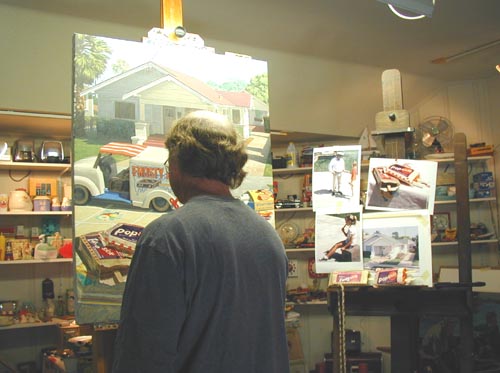
I've
drawn in all the other objects onto the canvas
and started blocking in the sky and background
trees. I'll move into the house now...
...defining
the detail in the siding and choosing hues of
gray to make up my shadow areas.
I've made
the shadows on the front facades of the house
vary from cool (area of house set back) to warm
as in the front porch projection. This part of
the house reflects more light off of the cement
walkway and sidwalk area, making the value
(darkness) lighter and warmer.
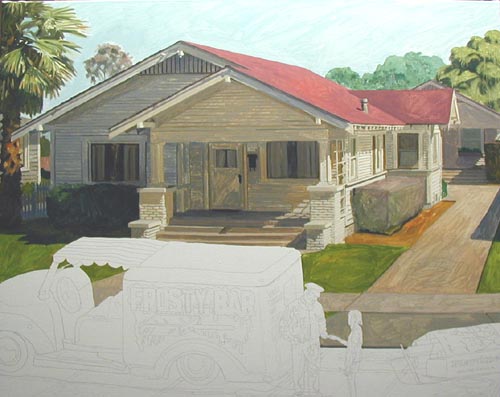
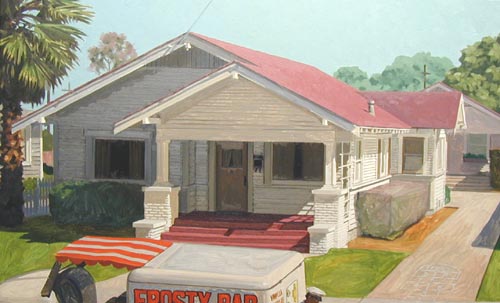
Here's
the house and background all blocked in with its
thin wash of oil and turpentine.
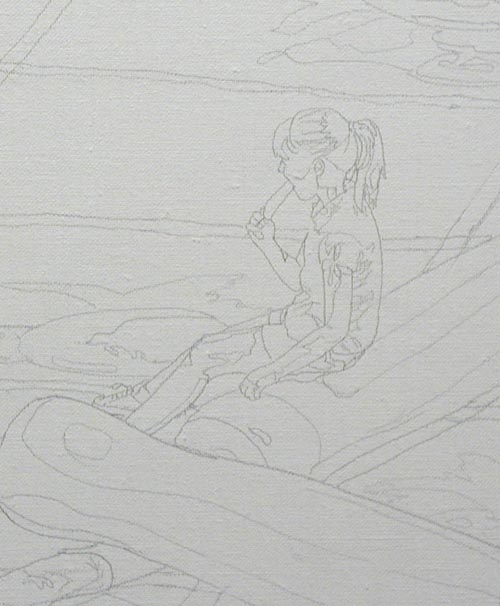
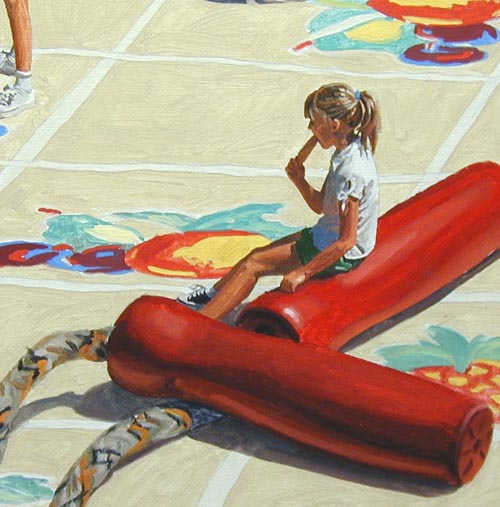
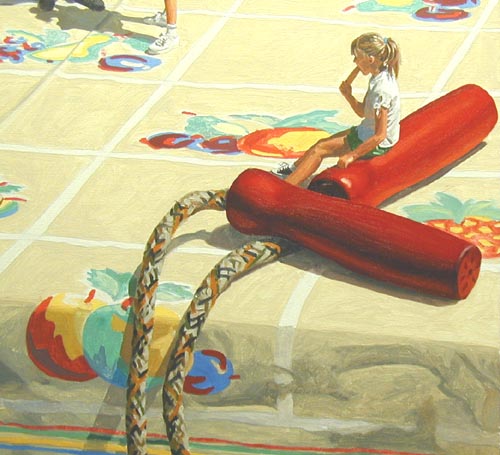
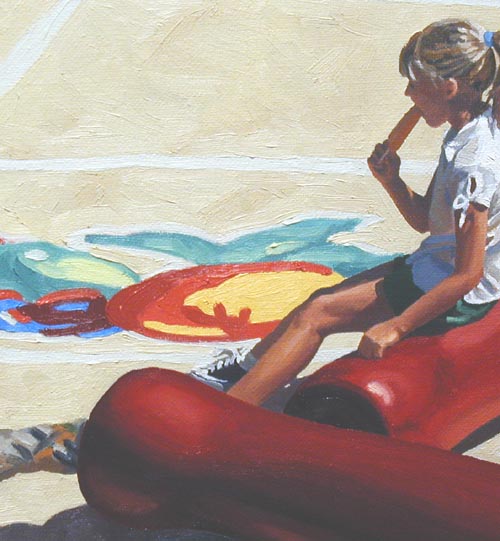
This is a
close-up of Aria in the foreground, sitting
on one of the jumprope handles. Her older sister, Makenzie,
is paying for both ice cream treats but she can't
wait and has started on her popsicle.
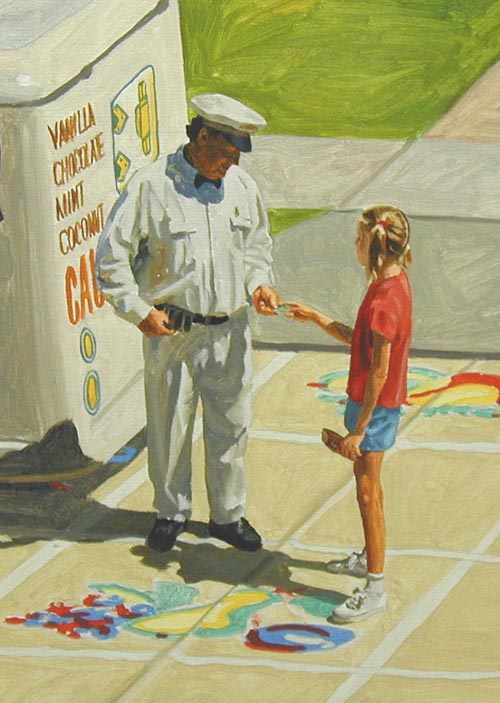
Here is
Makenzie paying the ice cream man. Notice
that the man's right hand is making change on his
'belt changer'. This is my changer, one that I
bought when I was thirteen for collecting monthly
subscriptions on my paper route.
The next
objects that I will paint will be those things
that have a generic color that defines those
objects. Things like clothing (except for the ice
cream man who has a uniform) that can be adjusted
will be last to be painted, giving me the option
to help balance or contrast the focal areas of
the painting.
Here you
see the box of chalk, which I have given a
preliminary pass of oil.
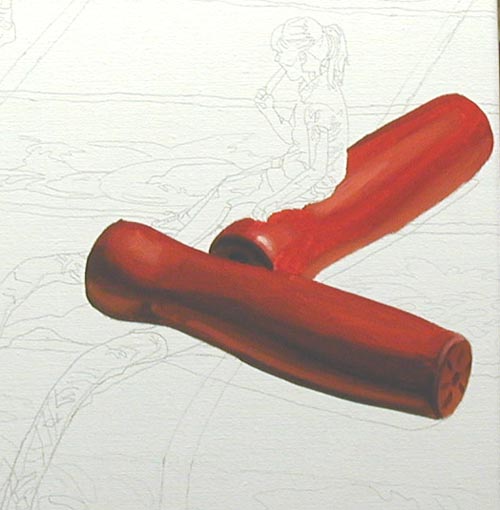
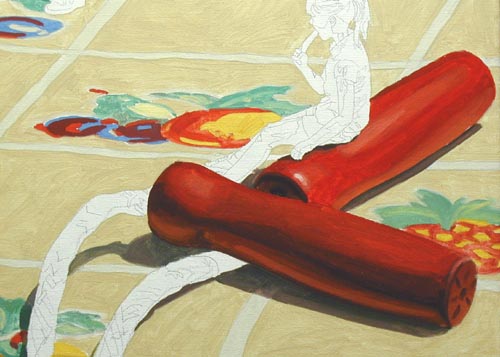
The
jumprope handles had to be red (although they
came in many colors) because they are most
identifiable in that color.
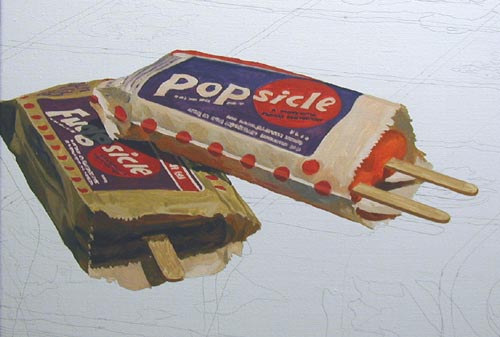
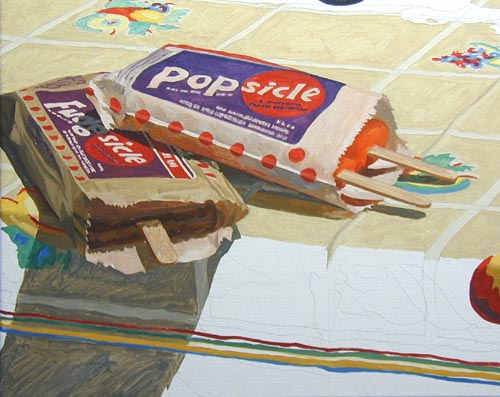
I've
painted the Popsicle and the Fudgsicle their
'generic' colors.
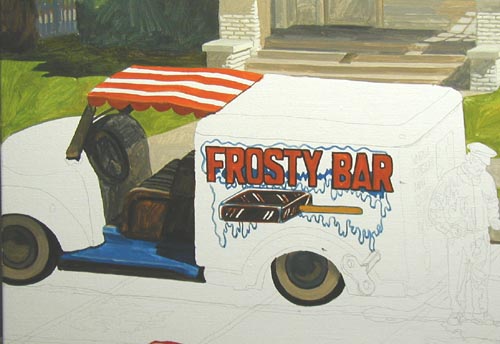
I've
begun to paint the ice cream truck. In order for
it to look more like a toy, I've added a wind-up
key on the lower rear of the truck.
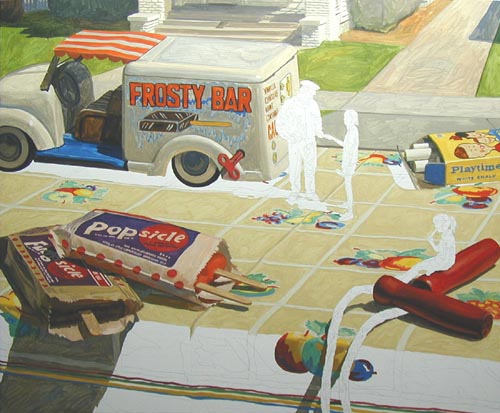
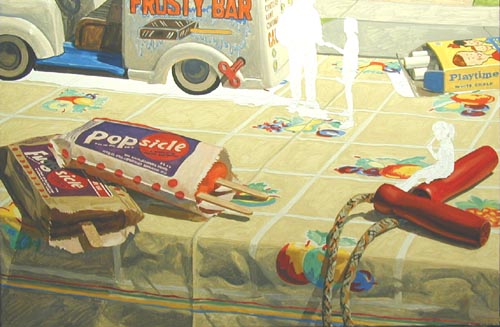
Here's
where the painting stands at this point.
The ice
cream truck is roughed in.
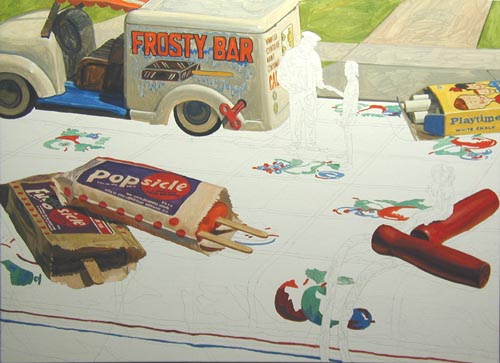
I've
begun to paint in the detail of the fruit
clusters in the design of the tablecloth. Once I
am finished I will pick a color to go into the
box design on the tablecloth. The actual color is
pink and I don't think I want that color
dominating the bottom of the painting.
I've
completed painting the fruit clusters and have
begun laying in the 'box design' on the
tablecloth. I've decided to replace the pink
color inside the squares with a warm tan and have
painted the lines that separate the squares on
off white.
You can
see that I've also started putting in the cast
shadows.
Here's
another close-up showing the cast shadows of the
ice creams. I've yet to start painting in the
darker value of the tablecloth that hangs over
the front of the street.
I've
blocked in the front of the tablecloth and...
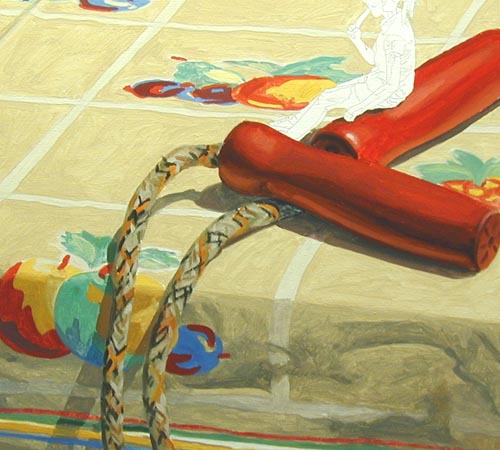
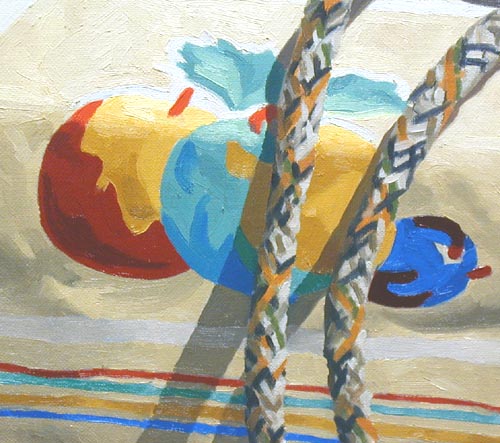
...put
the detail into the braided rope.
Two of my
models are in place.
And that
makes three!
The only
thing left is the jumprope diagram on the
driveway. It will go in as part of my second and
final paint application.
I've
begun the final paint application. I don't use
any additives (media), just the thickness of the
pigment right out of the tube. The sky and the
trees are finished.
The trees
in the upper right of the painting.

I drew in
with off white paint the hopscotch pattern.
The roof
has final paint as well as the left side of the
house (which I substantially darkened). I decided
to paint the steps and the porch a reddish color
to give the house a little more 'pop' and to
provide a better backdrop for the ice cream
truck.
I've
decided to add some interest to the cast shadows
coming from the house to the right of the
driveway. I chose Italian Cypress tree shadows so
that I could get a linear pattern that stops the
viewers eye from going up the driveway too
quickly. I don't mind someone enjoying the
'mother-in-law quarters' at the end of the
driveway, but I would like their initial focus to
be on the ice cream transaction and activities in
the foreground.
Here's a
close-up of the right side of the house. Except
for the brickwork on the front porch, the house
is done. The driveway and planter area is next.
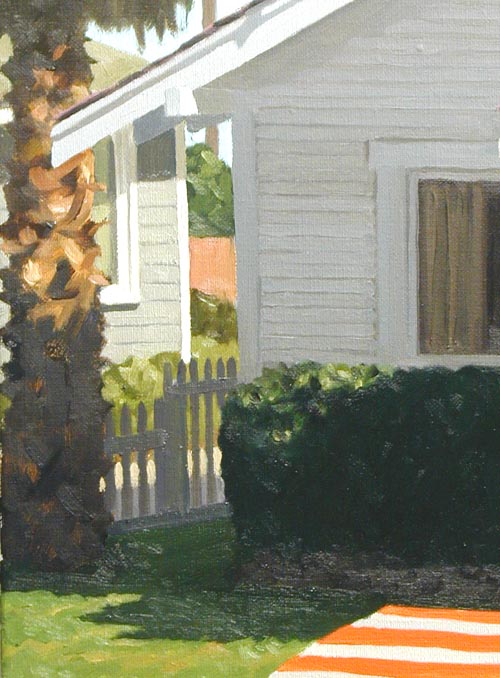
This is
the left side of the house. The play of light
through the picket fence and the narrow 'peek'
into the neighbor's backyard adds interest to
this part of the painting.
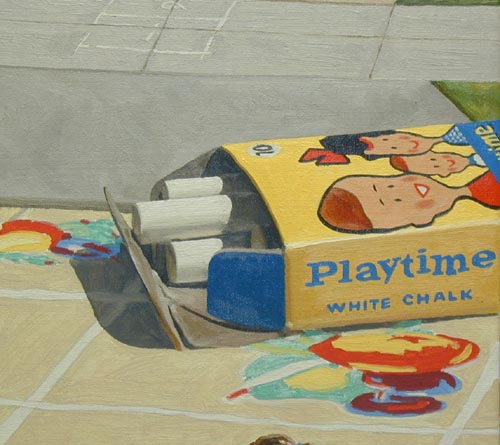
Chalk up
one more item painted... Sorry for the pun, but
the box of chalk is done...(now I'm rhyming!)
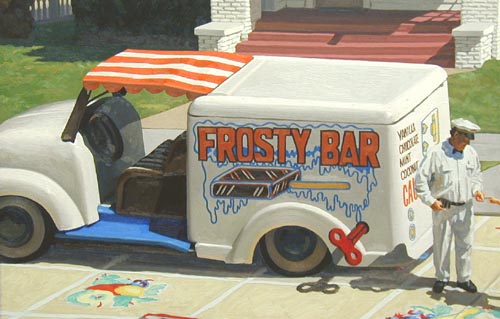
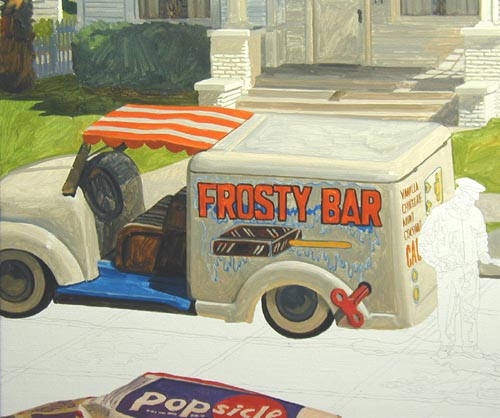
The ice
cream truck is completed. It's funny how a tin
toy looks fairly real when enlarged to human
scale...
And the
jumprope is fully painted. Now on to the Popsicle
and Fudgsicle.
Here I am
putting the finishing touches on the two frozen
treats and...
...now
they are done!

Two of my
figures are finished. Notice that although I have
used a small sable brush to do the details of the
figures (faces, hands and legs), I used a larger
bristle brush to do the clothing. It makes a nice
contrast and simplifies the clothing so that it
doesn't distract from the simplicity of the pose.

And that
makes three done! Now all I have left is the
tablecloth, which includes the cast shadow from
all the objects and the tablecloth itself.
Compare
this photo with the one above. Notice the heavy
paint on the tablecloth in this photo. I love
showing the brushstrokes of the heavy 'looser'
areas that surround a smoother 'detailed' area.
Here's
another detail of the tablecloth as it curves
over the edge of the table (or street?)
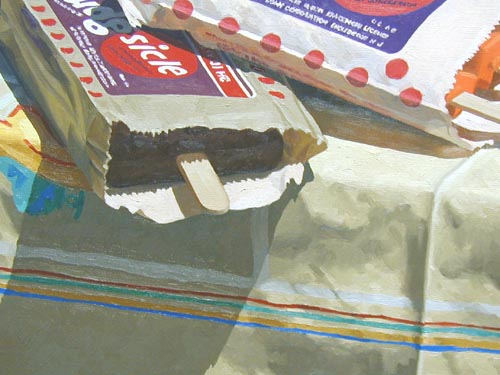
See how I
darkened the shadow under the Fudgsicle, helping
the wrapper 'pop' off the edge of the tablecloth.
I also made the cast shadow and darker vertical
areas of the tablecloth with a slightly greenish
brown cast to show that there is a warm
reflective light bouncing into it.
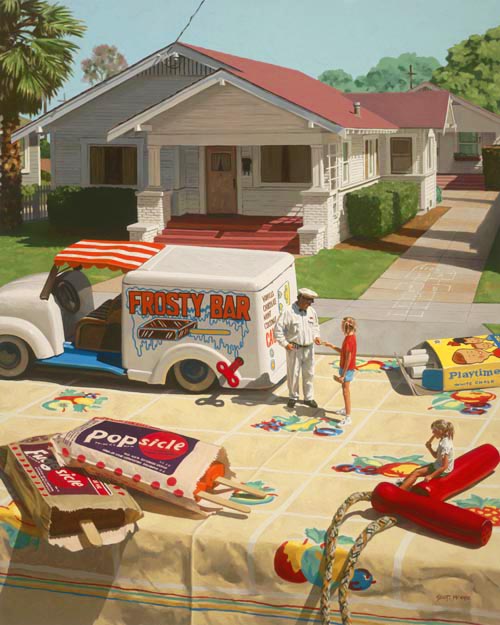
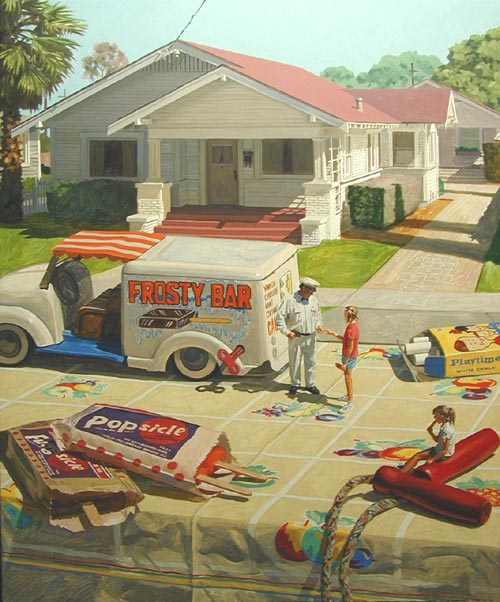
It was a
long haul, but "Ice Cream Man" is
finished. Hope you enjoyed the journey!
|