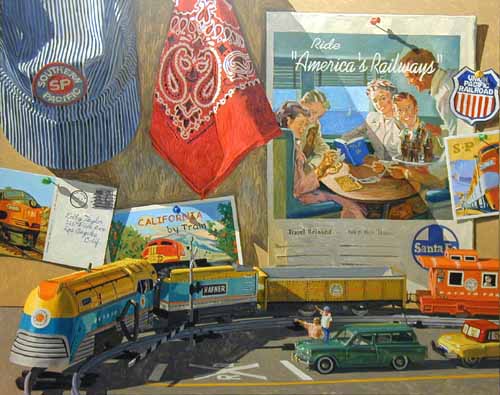
 "America's
Railways" is going to be an
image that portrays my facination with trains and
train travel. The line between reality and
fantasy is very thin when a child watches a model
train roll around the track. This painting will
hopefully erase that thin line.
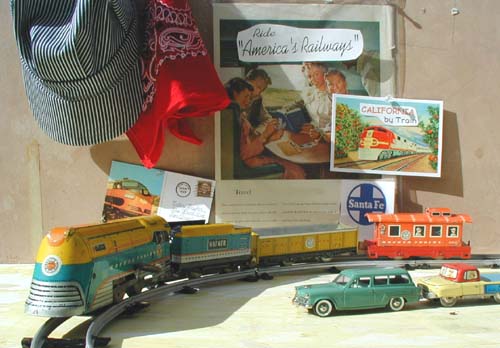
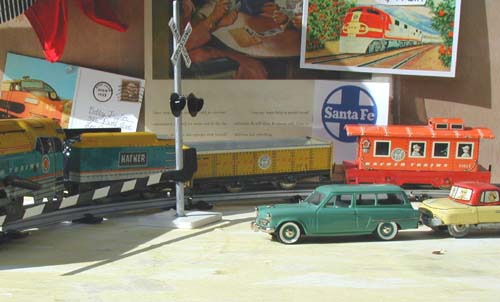
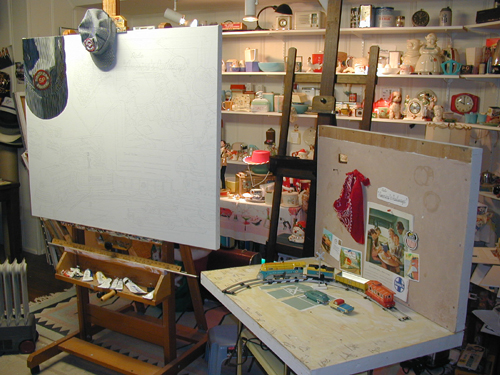
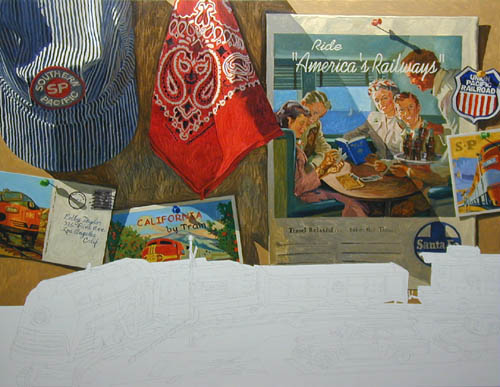
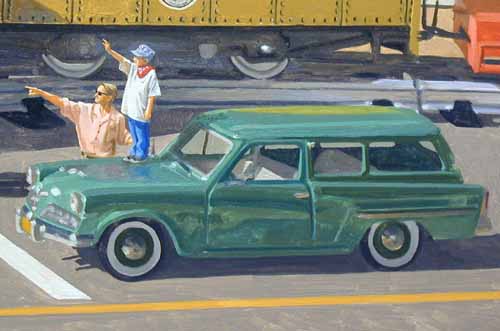
The
scene I am building above will show a station
wagon stopping at a street railroad crossing, the
driver knowing and anticipating the arrival of
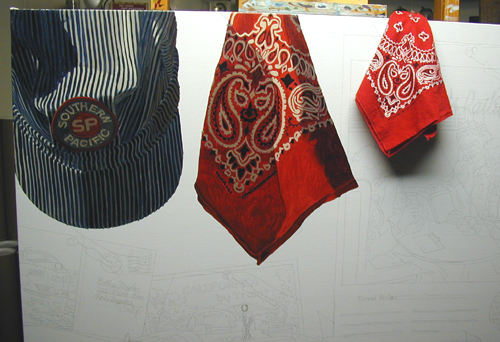
the train. He will be holding his son (who will
be wearing the engineer's hat and bandana) on the
hood of the car so that he can wave at the
engineer as he passes by on the tracks. On the
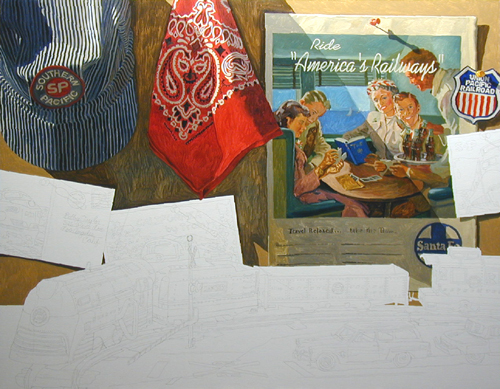
wall behind the train are postcards and a
"Ride America's Railways" ad that the
boy has pinned up on a wall in his bedroom, along
with his prized engineer's hat and bandana.
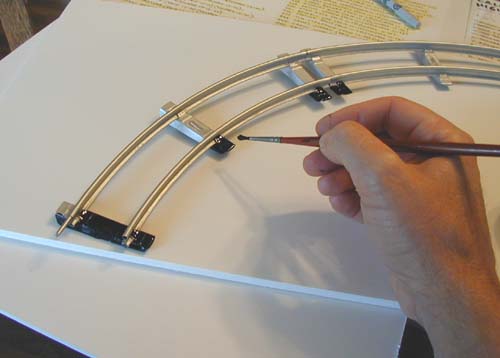
This
project began by locating various model train
parts. I refurbished a section of tracks...
...Built a
crossing gate from scratch (cardboard and an old
paint brush handle).
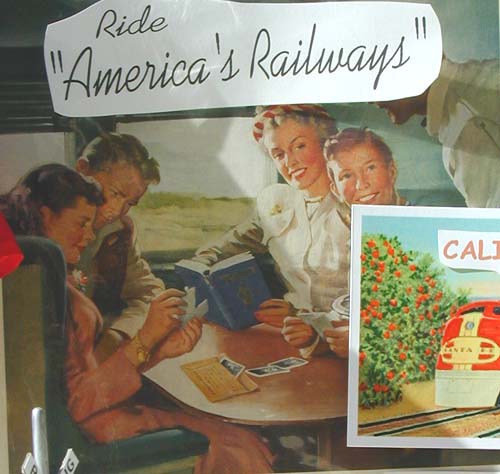
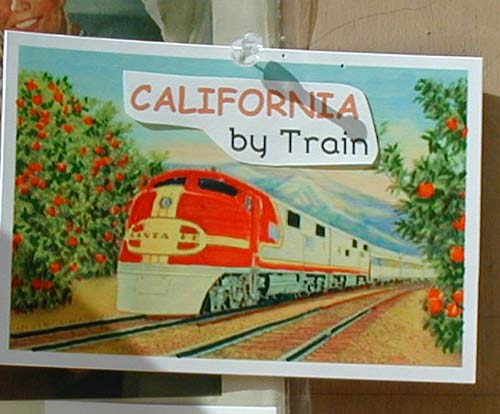
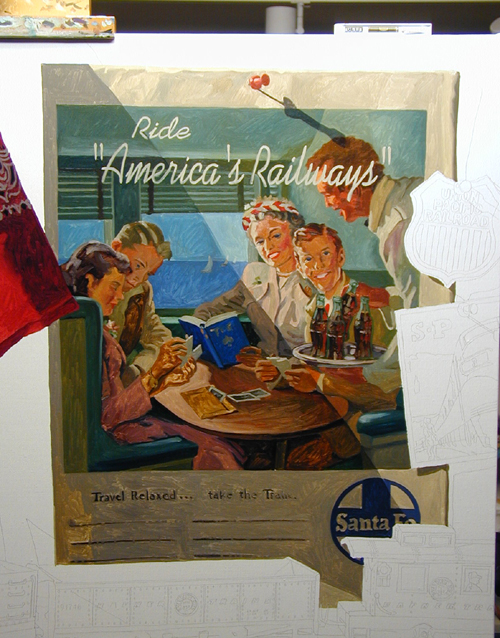
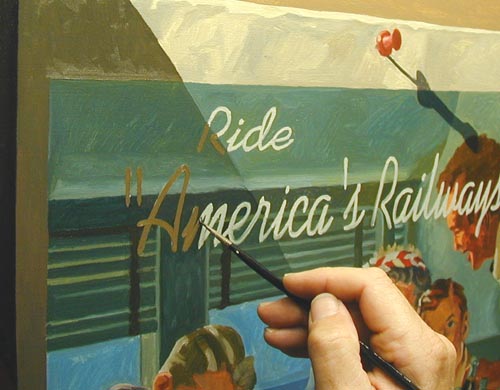
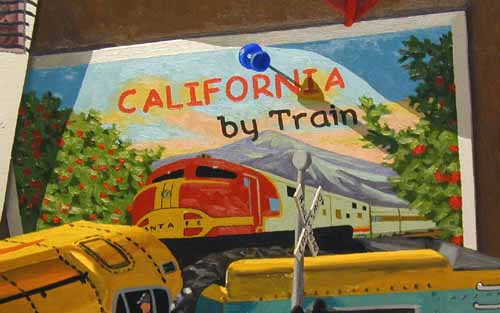
I
found an old ad in a magazine that had a nice
illustration of a family on a train trip. I
printed out some copy that I will paint into the
illustration, making it a 'train ad'.
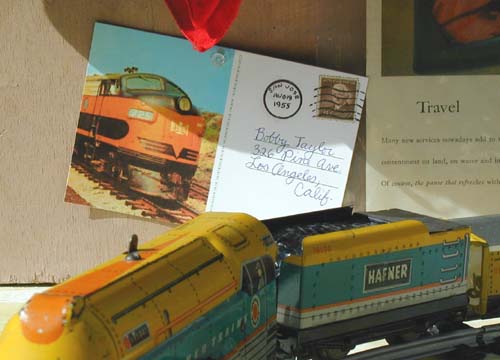
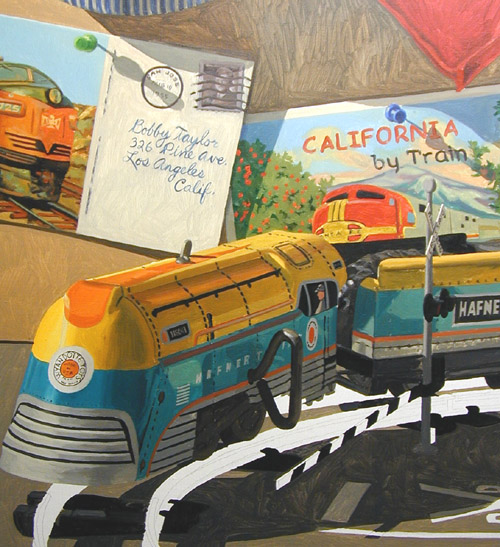
One
of the postcards on the wall is addressed to
'Bobby Taylor', the boy on the hood of the car.
Another
postcard that I will paint some wording into to
make it more interesting and helpful in telling
the 'story'.
Here's
the finished crossing sign and gate. I will have
to size it down in the painting since it is too
large for the scale of the other objects. I
didn't have the patience to make it any smaller
when I constructed it.
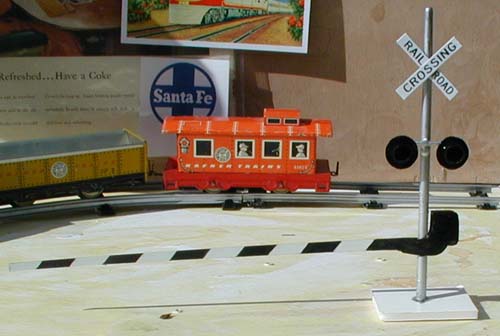
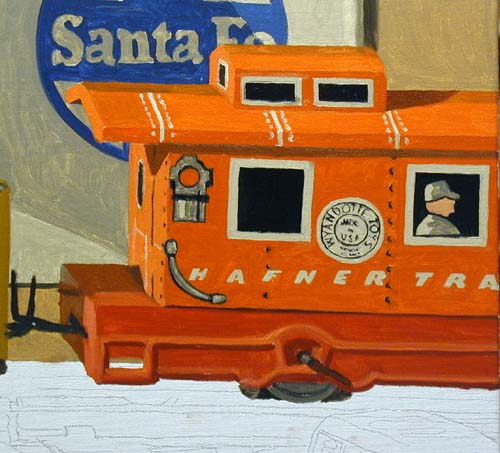
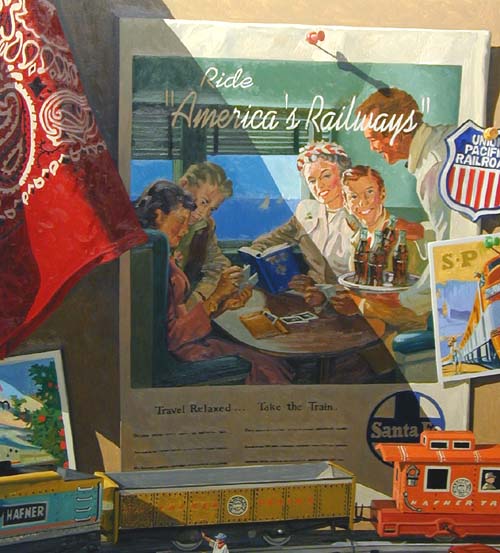
Here's
a view of the crossing gate in it's approximate
location. Notice the 'Sante Fe' logo behind the
caboose. I will paint that into the ad on the
wall, making it a 'Sante Fe' railway travel
promotion ad.
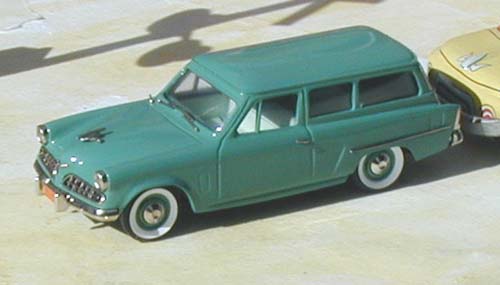
My
station wagon is a scale model of a 1954
Studebaker Conestoga. I will be painting it to
look real, not like a toy so that it will be the
proper scale for the 'father and son'.
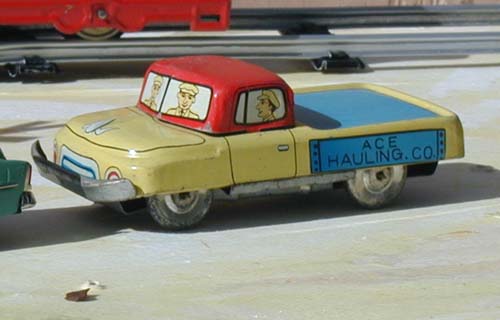
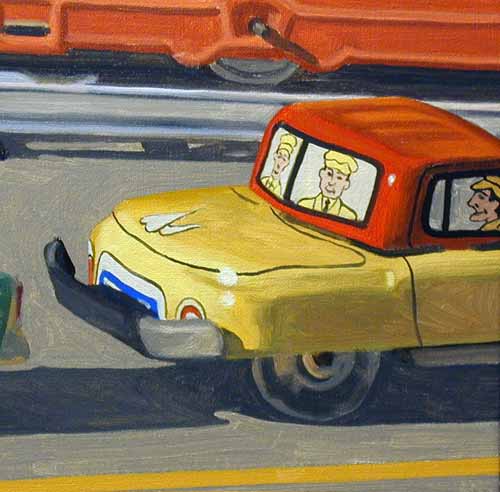
I
love the 'funkiness' of these old tin cars. This
truck (if there is room in the design) will
probably go behind the station wagon, also
waiting for the train to pass...
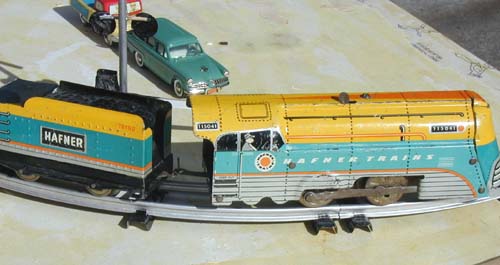
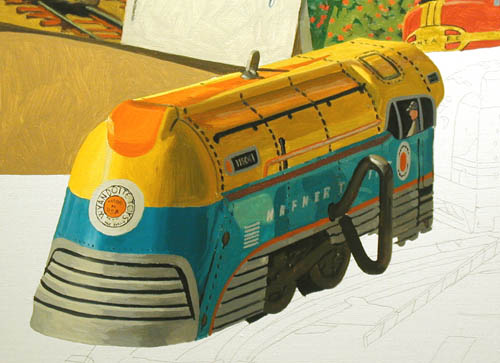
Here
is another view of the 'Hafner' train engine. On
the other side (the side that will be visible in
the painting), there is a large wind-up key. This
train is not electric, but a mechanical one with
a clockwork motor.
I
am still arranging all the objects and awaiting a
'Southern Pacific' patch, which will be sewn onto
the front of the 'engineer's hat'. I'm also still
looking for the right 'father and son' to pose in
this painting.
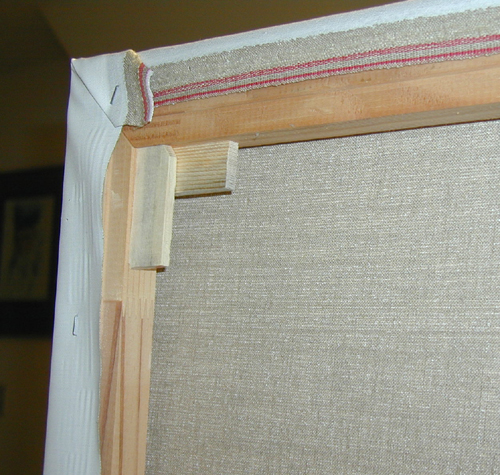
I
stretch each canvas myself, using extra heavy
duty stretcher bars and the finest linen canvas.
Ordinarily the wedges in the corner are used to
stretch raw canvas before it is primed. I use
them because the double-primed linen is very
ridgid and difficult to strech compared to cotton
canvas.
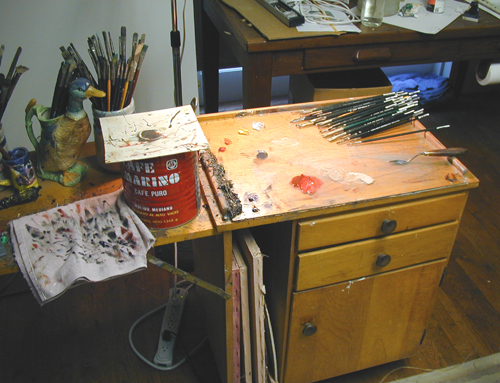
Here's
a view of my palette. There is a sheet of
1/4" plate glass on top of the wood surface.
The coffee can holds a jar with my turpentine in
it. The overspill goes to the bottom of the can.
I keep the cardboard cover on it to keep the
fumes to a minimum.
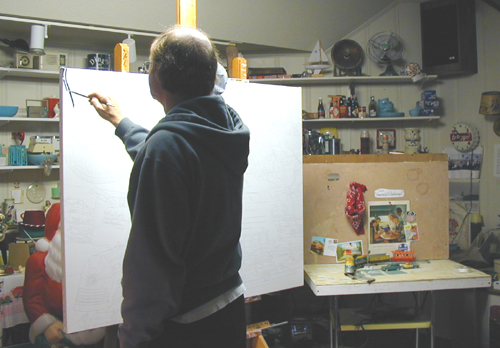
With my
props set up to my right, I begin the painting.
I spent a
few days drawing in all the objects on the
canvas. This particular painting will be 40"
x50".
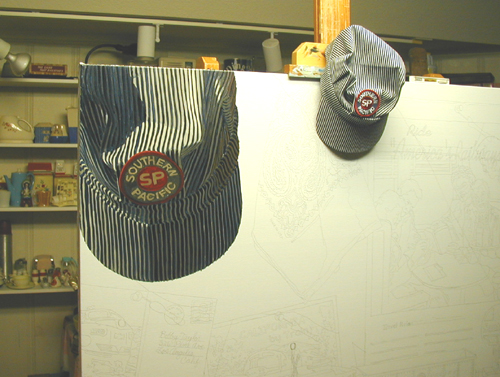
The
'engineer's hat' is blocked in.
Here's a
look back at my 'set-up'. Notice the left corner
of the photo...it shows the small space heater I
use to warm up my painting area. This has been a
pretty cold winter so far (for California).
The
bandana is now blocked in.
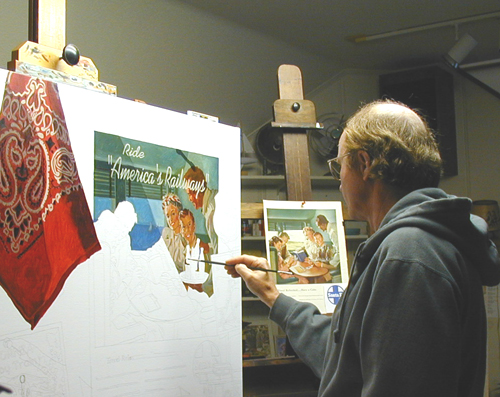
Here you
can see how I use my second easel to bring the
magazine ad closer to my canvas so I can see it
to paint.
Notice
how I have made the view out the railcar window
different than the original ad. It now shows the
ocean, indicating that this train's route is
along the coast...
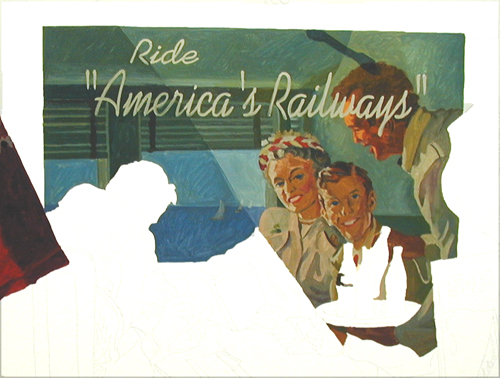
The
'Santa Fe' ad has its first coat of paint.
Today I
worked out the shadow patterns on the wall and
painted the Union Pacific Railroad patch.
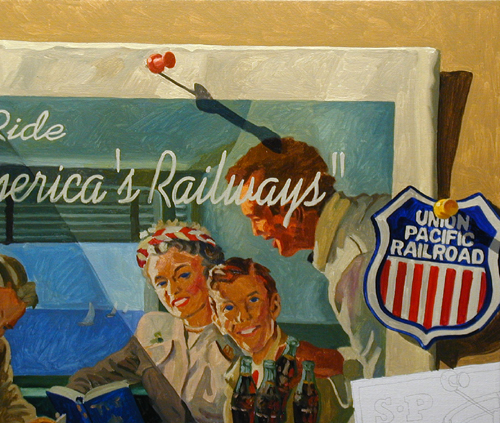
Here's a
close-up of the patch area...
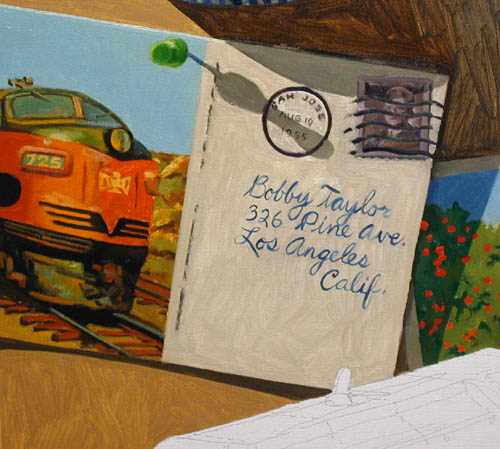
And a
close-up of one of the postcards.
The
entire backdrop/wall with all its memorabilia are
blocked in. The foreground is next...still need
to find the 'father and son' models!!
The
locomotive has its first coat of oil...
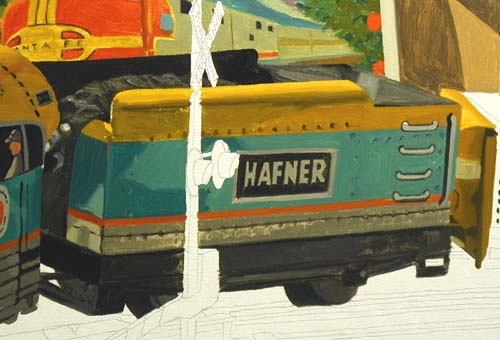
as well
as the 'coal car'...
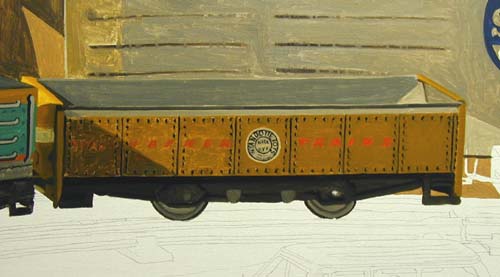
the
'gondola car' and last but not least...
the
caboose!
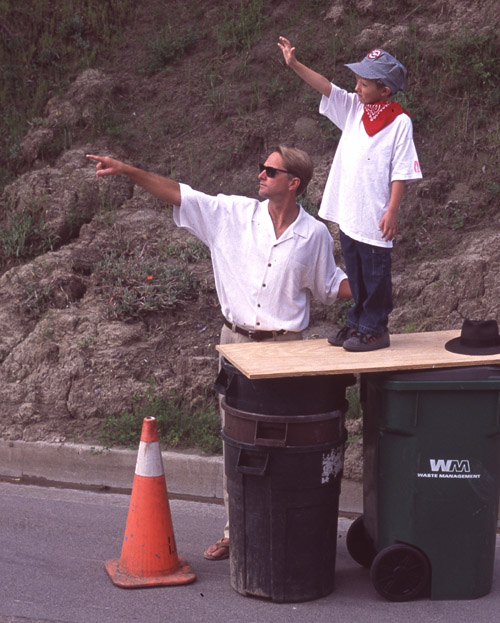
Here are
my two models. My neighbors Adam and his son Max.
They worked out great. Too bad the sun wouldn't
cooperate today. I'll have to add the 'sunshine'
and shadows to both of them when I paint them in
place.
I had to
scrape some paint off behind the boy's head and
arm so that it wouldn't show an overlap line.
I've begun to work on their skin tones.
The
ground and cast shadows have been blocked in as
well as the railroad crossing sign. Just need to
paint the tracks and the train will 'sit down' in
the painting...

Here's
Adam and Max.
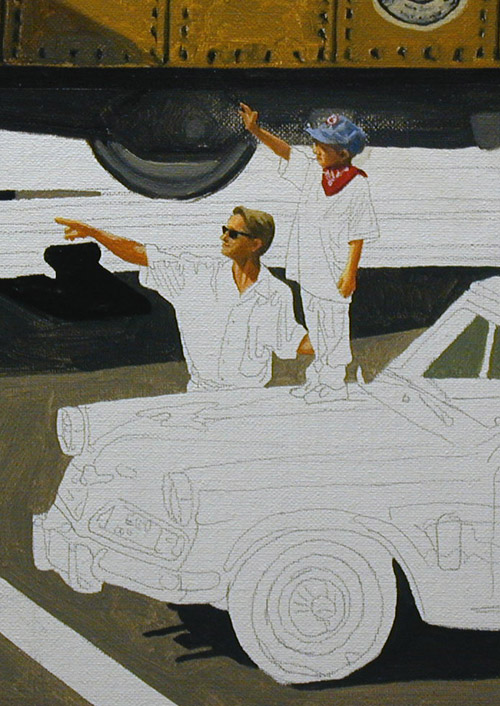
Here's a
shot of the car... Although I used a scale model
in the 'set up' for the painting, I also used
photos of Mike Van Veghten's Studebaker Conestoga
and Mike has emailed me with other technical info
to help with the authenticity of the station
wagon.
And the
truck sitting behind them...
And now a
photo of the whole painting, completely 'blocked
in'. Now it's a matter of applying 'straight from
the tube' consistency paint over the entire
painting, adjusting the proper hue, value and
detail.
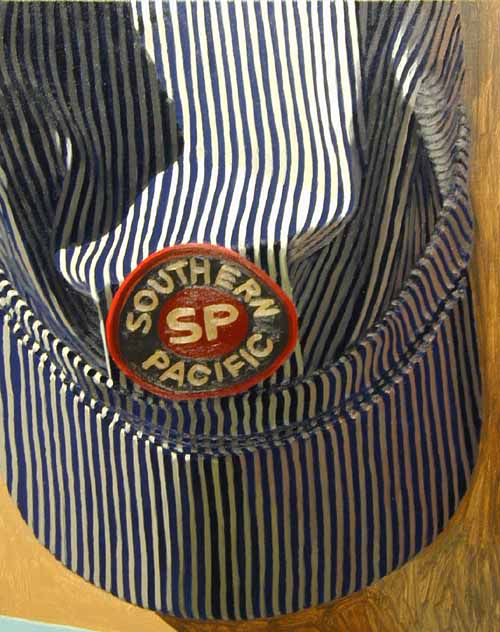
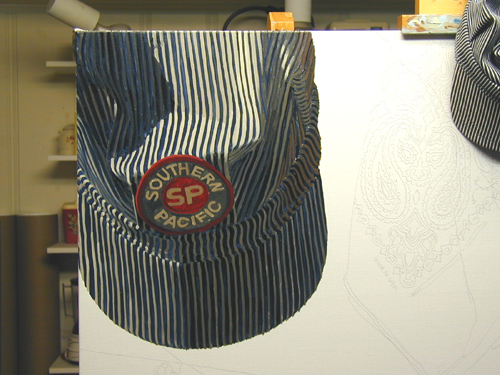
Here's a
close-up of the hat with its final paint applied.
Notice the reddish and yellowish tints of color
in the shadow areas, showing the reflective light
from the red bandana and the train below.
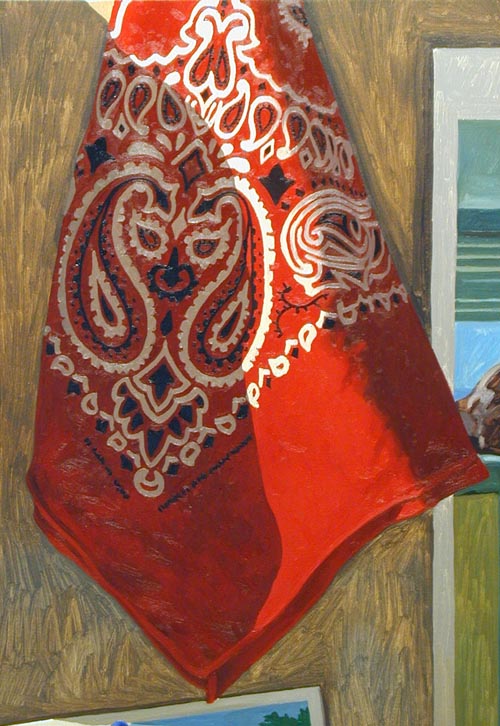
Bandana
is done...
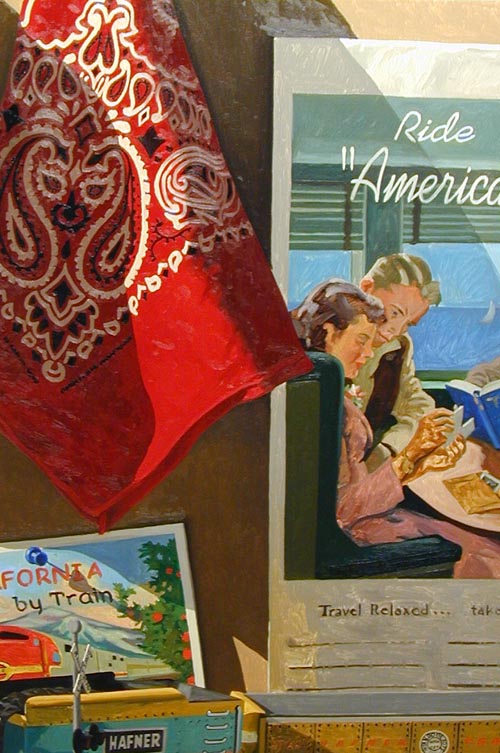
I have
just painted the 'correct' value (darkness) on
the cast shadows on the back wall. Notice how it
makes the train ad pop out visually. It tells me
that I have to darken the train ad (the areas on
it that are in the shadow) considerably to get it
to 'sit down'. Those values looked good in the
beginning of the painting because I only had the
white of the canvas for comparison. Notice (in
the ad) the bench that the woman on the left is
sitting on. I have darkened it considerably. The
white border around the illustration will
visually get lighter as it gets surrounded by
darker values.
I've
'grayed down' the white paper border of the ad
that lies in the shadows. I now have to 'match'
the value of the type "Amer" with the
value of the white border. This makes the
lettering blend in with the illustration, telling
me that the hues that surround the lettering will
have to darken to make the type show up.
Notice
now how the type "Amer" shows up. I
have painted all the area on the ad shades darker
to make the type read as white lettering that has
a shadow on it. The cast shadow line is now more
defined. Also note the lower left corner of the
ad. The sun passes through it, so I've painted it
lighter and warmer, giving it a translucent glow.

The ad is
finished as well as the Union Pacific patch and
SP card.
Here's a
detail from the ad.

And a
close-up of the Southern Pacific card.
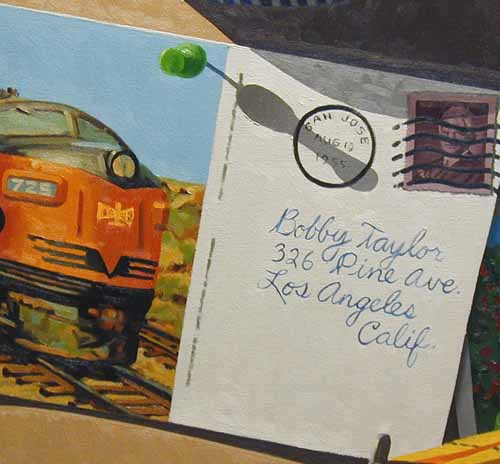
Close-up
of one of the finished postcards.
The other
postcard.
A real
close-up to show the attention to detail.

The
entire background is finished! Now, on to the
forground objects...
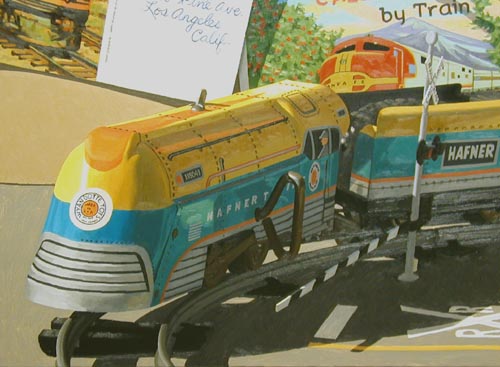
Detail
of the finished engine.
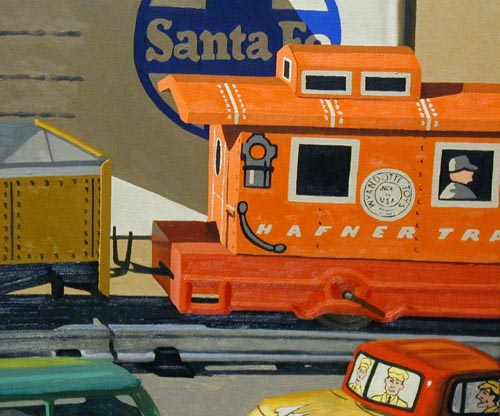
Finished
caboose.
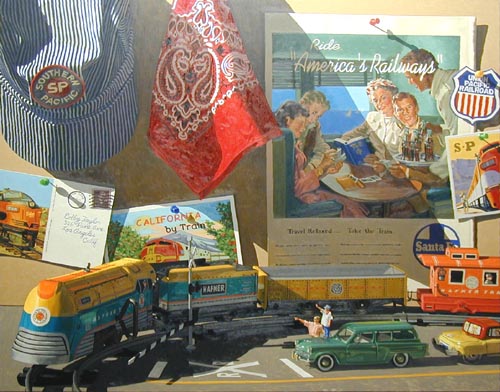
Entire
train and background are finished. Just the two
figures, station wagon, toy truck and pavement
left to paint.
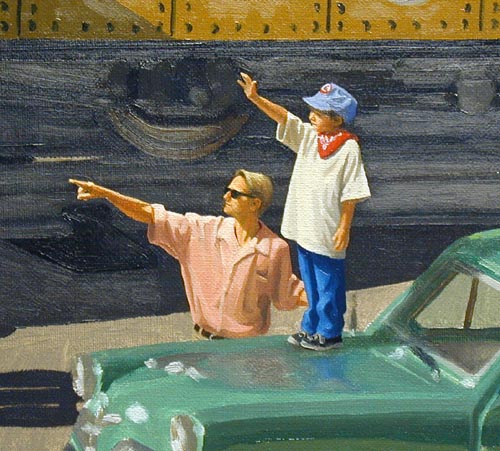
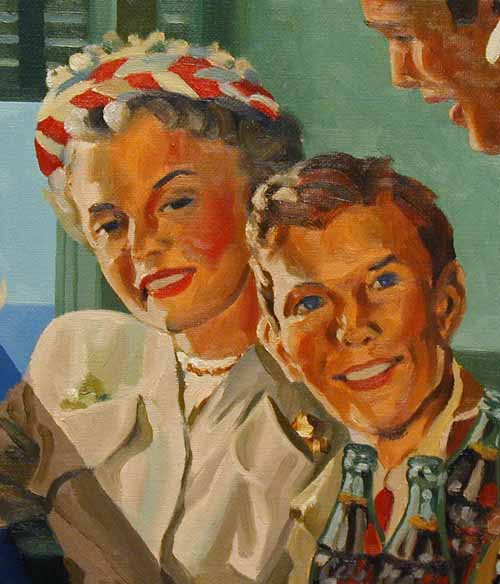
Father
and son are finished.
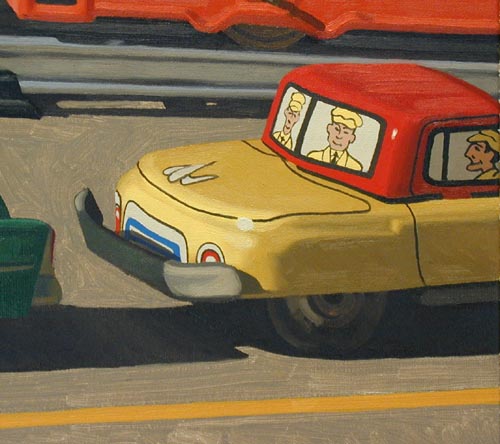
The truck
is finished...
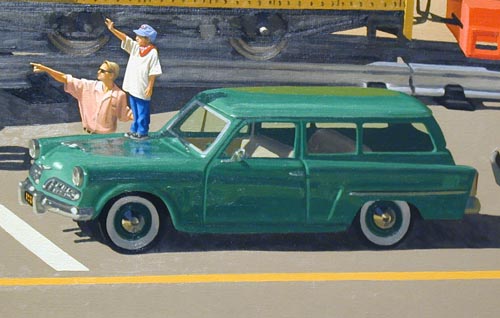
As well
as the car. The pavement with its lines are
painted and...

"America's
Railways" is finished. This was the most
time intesive painting I have ever worked on.
Each piece of the painting was a small painting
in itself, requiring close study in order to
render each in its own special way. I hope you
enjoyed following it's progress.
|