
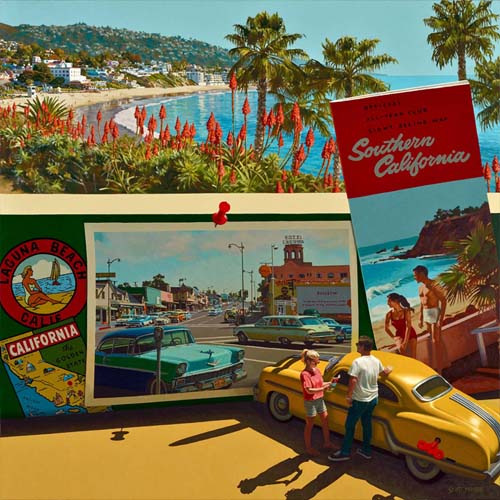
"A
Postcard from Laguna."
A couple has left their home where they keep a handful of
mementos on the wall below a window...two travel decals, one
depicting California and the other Laguna Beach. Leaning against
the wall is a travel brochure and pushpinned to the wall is a
picture postcard, showing the Pacific Coast Highway and the
entrance into the town of Laguna Beach. They stop, and as she
checks the travel brochure one more time, he looks south, up
Pacific Coast Highway to their destination, Laguna Beach.
Outside the window, the view from Heisler Park, looking out over
main beach.

I've begun the painting with the two travel decals. Until I find
my models for this painting, I will be painting all the areas
that don't touch where the couple are standing.

Moving over to the travel map, I've started at the top with a
mixture of cadmium red, alizaron crimson and black to block in
the upper part of the map.

To help me see the correct value for the "Southern California"
lettering, I've put a blue mixture of Thalo Blue, cadmium yellow
and white in the sky portion of the photograph.

Now I've gone back to the lettering and begin to paint it a gray
hue since this side of the map is in the shade. The mixture is
my old standby, ultramarine blue and burnt sienna.

Working from top to bottom, I've painted in the ocean and the
cliff.

The figures were fun to paint. The older style bathing suits
were quite fashionable!

Here is a look at the entire brochure. As with all objects
painted in this first passage of turpentine thinned down oil
pigment, I'll evaluate the hues and values before painting the
final layer of tube thick paint.

Next, I'll move into the background image outside the window.
I've blocked in the sky with a mixture of thalo blue, cadmium
yellow and white. The palm trees and aloe vera flowers will be
my beginning point.

A couple more palm trees and the ocean are put in fairly
loosely.

Here's a closeup of one of the palms. I'll render them in a
painterly fashion so that the view outside the window isn't a
photographic reproduction.

Here is a look at the entire canvas so far. I've continued to
paint the aloe vera flowers and palm trees. Aloe vera greenery
is next.

Here is a close-up of the aloe vera and the foliage outside the
window.

This photo shows the entire width of the canvas outside the
window.

With the middle ground foliage completed for now, I've moved
onto the distant beach. I'll put in some people on the beach
later. Next, I'll attack the town and the hills.

I've begun detailing the beachfront and some of the trees as
they make their way up the hill. Everything is being painted
simply, without getting too concerned for exactness, while
maintaining the charm of the city.

Here's a detail of Main Beach as I work from left to right on
the background.

Slowly moving across the distant hills.

Here's another detail of the background all roughed in.

The city is completed for now.

I've moved on to the postcard now. Determining how dark to make
it at this point is just an educated guess. It will have to be
adjusted with the final layer of oil pigment. I'll show a
handful of steps as I paint the postcard.

When I painted the sky on the postcard, it looked too dark
because of the white canvas around it. As I darken the buildings
and other elements, the difference in the values will brighten
up the sky.

I'll paint the foreground cars in detail and get more painterly
as I move into the background of the postcard.

More work on the east side of PCH.

A closer view of the buildings. It is like working in miniature
as I use my double ought sable brush to carve the shapes of the
structures.

I've painted in the grouping of cars heading north on Pacific
Coast Highway, trying to capture the different makes and styles.
I'll move up the street to render the line of cars you see in
the white of the canvas.

The city street is roughed in. Just the foreground cars to
complete.

The '56 Chevy is painted in with a thin layer of oil.

I've always had an affinity for parking meters...not for their
purpose but for their shape and ability to add a design element
into a painting. I've inserted them in many of my paintings over
the years.

The station wagon below the shell sign is now painted in as far
as I can go until I draw my two figures into the painting. The
pandemic makes it impossible for me to find two suitable models
right now, so I will paint everything I can until then.

Here is a photo of the entire canvas. I'll do a little work on
the foreground toy car next.

I painted the tail end of the vintage tin car and won't go any
further on the unpainted area of the canvas until I find two
models for the painting.

Since it will be some time before I can find my models and since
all areas that can be painted with the first thinned down layer
of oil pigment are done, I will start applying the final layer
of tube-thickness oil in areas that won't disturb the unpainted
space on the canvas.
I've started in the sky with a mixture of white, thalo blue and
cadmium yellow. If you look closely, you can see the thicker
brush strokes going up and down in the sky.

The first thing I noticed when painting the sky was that the
distant hillside which I had intended to take on a cooler cast
is still too dark and doesn't separate itself from the
foreground hill that moves down onto the coast highway. I'll mix
all my colors for the closer hillside so that they are a step or two
lighter in value and possibly a step cooler in hue.

The top photo is what the distant hillside looked like with the
first passage of paint. The bottom photo shows how I
lightened/softened and cooled it off so that there is some
atmosphere between the downtown city hill and the distant one.
This separation not only adds interest to the image outside the
window, it helps to bring the viewer's eye onto main beach and
closer to the edge of the window.

I'm now going into the beachside buildings and tightening up my
drawing, rendering the details with some accuracy while keeping
it painterly at the same time. The foliage will be painted after
all the structures are finished.

The Main Beach area and coastline are completed. Here is a
detail of the left side and...

...a detail of the right side.

Just to give you some idea of the scale, the people standing on
the sand in front of the Hotel Laguna are about 1/16" high. The
ocean and sand are also finished.

Moving away from the sand and water, I'm concentrating on
the palm trees and then will move on to the aloe vera plants
just below the window ledge.

The palm trees are finished. Their dark values help to put
distance between the foreground and background.

The meticulous job of rendering the aloe vera flowers has begun.
Each flower has a minimum of 4 values.

The aloe vera and other various species of plants are now
finished. Here are a few photos to show the end result.

Aloe vera presents a pretty wild assortment of shapes to paint.
Although I rendered some areas to show the shapes of the aloe
vera leaves, a great deal of the shrubbery is painted in a free
flowing manner.

Here is a view of the whole window. I'll move onto the travel
map next.

I decided that the car looked too real and not like a toy car,
so as I have done with some vintage cars in the past, I've
painted in a wind up key.

I just painted the red portion of the travel map, darkening the
value so that it looks more like it is not in direct sunlight. I
then compare the value of the sky to the red value, darkening it
relatively.

Now that the sky portion of the photo on the map cover is filled
in, you can see that the sky is now darker than the ocean. In
order to make the sky look correct, I'll darken the ocean next.
As I move down on the photo, everything will have to be darkened
proportionately.

With the ocean darkened and all other elements of the travel map
darkened to match, the sky returns to a lighter color and the
map is done.

While 'social distancing,' I photographed my daughter, Hayley
and her husband, Steve for the painting. Although I will be
using the photo above for their poses...

...I'll be using Steve's head from this photo. I liked him
without the hat and I liked his sunglasses.

I sketched in the two figures and have begun painting around
them.

The areas around the man and woman are all painted.

Here is a look at the entire painting.

I've mixed cadmium yellow, burnt umber and white to make the
warm hue for the ground underneath the shadows. Now, on to the
figures.

Steve is first. I'll start at his head and work down his torso.

Steve is all painted in with mostly thin washes of oil.

I've started on Hayley. Notice that the paint application is
thicker in her hair. I tend to start applying thicker paint when
I work on a portrait. This is because I am going back and forth
into the shape, making small adjustments to get the proportions
correct. I need to stack thicker paint on the earlier strokes of
thin paint or the changes wouldn't be noticeable.

Hayley is finished. The lighting in my studio sometimes
highlights the canvas texture, making it seem like the image is
washed out. This is only a phenomenon in the photograph, not the
actual image.

Both figures are in place and...

..."A Postcard From Laguna" is half way done!

I'll work around the painting at this point, applying a second
layer of pigment to each object, adjusting the hue and value to
its final place in the painting.

As I move on to the California travel decal, you can see how
much I am increasing the value of the lettering so that the
decal looks like it is in the shade and doesn't compete visually
with the white areas in the sunshine. I'm applying a mixture of
ultramarine blue, burnt sienna, white and cadmium yellow for the
darkened gray pigment.

Notice the subtle, but necessary shadow under the postcard edge,
on top of the decal. This detail shows the result of the light
reflecting off the ground and onto the objects on the wall. The
postcard is a little off the surface of the wall, so it casts a
soft shadow on the California decal.

I've just completed the green wall that the decals and postcard
are attached to.

This photo shows two days of work, darkening the values and
correcting the hues of all the objects in the postcard. In order
for the postcard to look somewhat in the shade, I'm darkening
everything in the image. There are still a number of places I
need to darken in this section of the postcard, but if you
compare it to the first layer of paint, you will see that
everything is being adjusted.

This section of PCH is done. I'll move down the street and then
come up the other side where I'll finish up in the front of the
post card with the Chevy and the station wagon.

As I work down the street, the cars get smaller and smaller. You
can see by the size of my thumb that the cars in the distance
are less than 1/4" high. Can you spot the VW bus that I put into
the postcard?

The right side of the postcard is finished. That was a lot of
paint mixtures for all the separate detail. The '56 Chevy and
the parking meter are next and the last objects in the postcard
to paint.

The darkened Chevy and parking meter put the final stamp on the
postcard. To reflect that the bottom of the postcard is getting
less bounced light than the middle and top, I darkened the lower
part of the Chevy's bumper and grill area.

Here's a look at the entire canvas. Painting over the yellow toy
car, the man and woman, and the ground with the shadows will
complete this painting.

This photo shows the finished toy car. I tried to emphasize some
of the crude tin pieces that make up the trim, so as not to make
it look like a real automobile.

Hayley is finished. I used a 00 (double ought) Round and a 00
(double ought) Bright red sable brush to tackle the small
details of her facial features and hands. Combinations of white,
cadmium red, burnt sienna, burnt umber and cadmium yellow made
up the flesh tones.

I finished Steve today. I darkened his jeans and tennis shoes a
lot, and also increased the values in his t-shirt.

With 4 different values of burnt umber, black, cadmium yellow
and French ultramarine blue, I painted in the dark shadows cast
by the wall, the car, the push pin, the brochure and the two
people. As a shadow gets further away from whatever object is
casting it, the value lightens. For instance, the value of the
push pin shadow is lighter than the shadow cast by the car. The
man and woman's shadows get a little lighter as the shadow moves
from their feet to their heads.
With the foreground flat surface painted with a mixture or
cadmium yellow, burnt umber, burnt sienna and white, "A Postcard
from Laguna" is finished!
|


