![]()
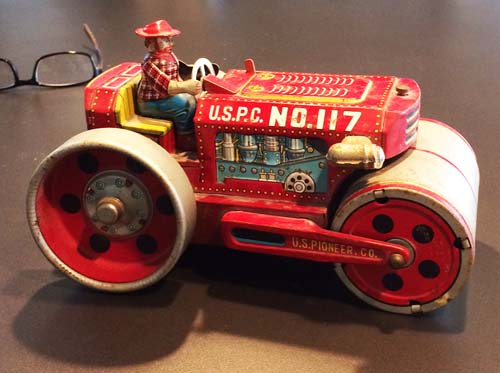 I'm always looking for a unique tin toy that sparks my imagination. When I saw this steam roller on eBay, I was all over it. I immediately thought of the roller in the street, rolling out cookie dough. This commercial process of larger than household dough rolling told me that I needed a building for a bakery. 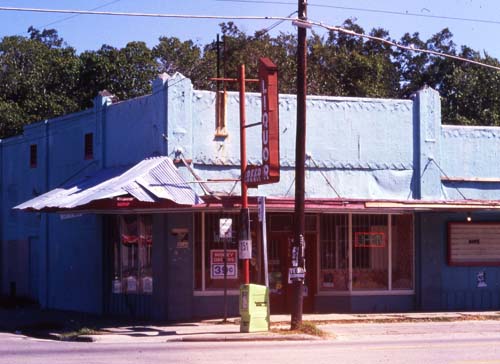 I went into my boxes of 35mm slides from the past and came up with this liquor store on the outskirts of Nashville, Tennessee. I photographed this building while I was researching the Nashville area for information to paint a commissioned oil painting for Houston's Restaurants.  This vintage wooden rolling pin will help decorate the bakery building. 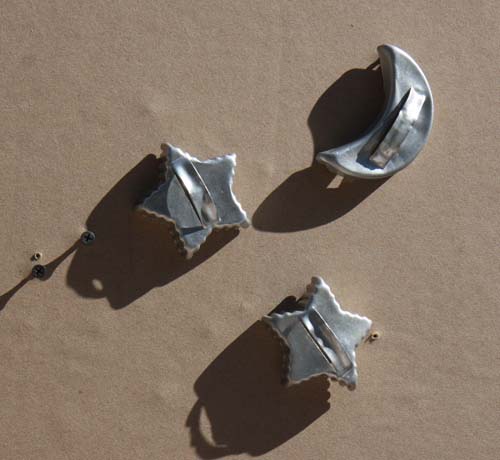 Since I was thinking of sugar cookies, I purchased these vintage stars and moon cookie cutters. I visualize them hanging on a wall or the sky, casting some long interesting shadows. 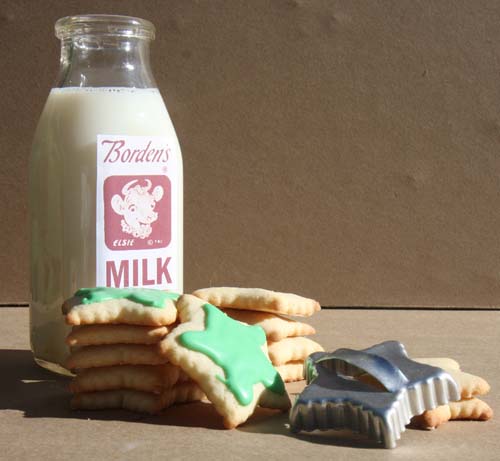 What goes better with cookies than milk? I had this old milk bottle which I stuck a vintage Borden's milk label on its side. With Carol's help, I rolled out some dough and made some cookies, applying frosting on a few of them. 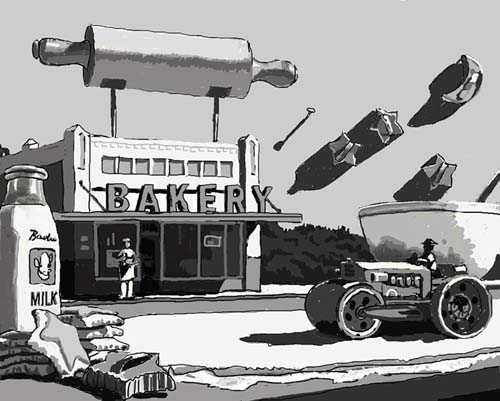 Here's my sketch of "Milk And Cookies." The baker has come outside to direct traffic. 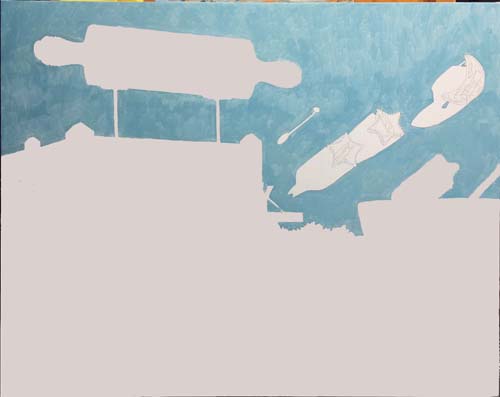 As with all my paintings, I hand stretch the finest Belgium portrait linen onto heavy duty stretcher bars. I've drawn out the design of the painting onto the canvas with a #2 pencil. To begin the painting, I've painted in the sky with a mixture of thalo blue and cadmium yellow, thinned with turpentine. 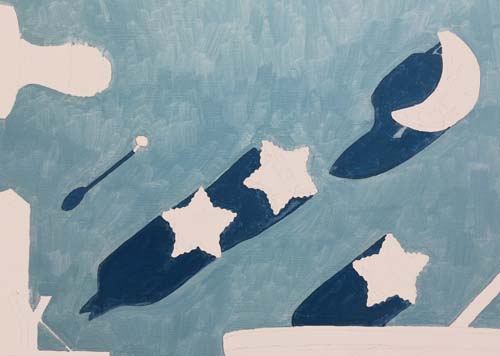 Next, I've blocked in the cast shadows from the aluminum cookie cutters that are hanging from nails on the sky. 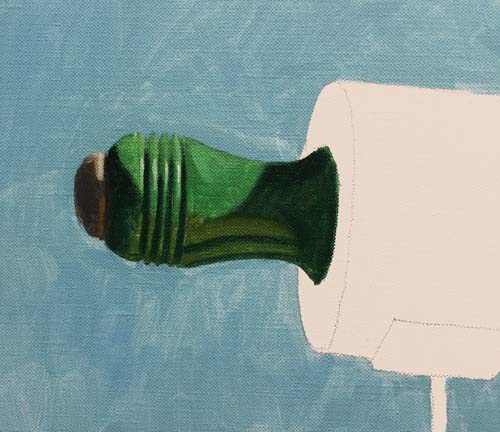 I've mixed up a green from thalo green, cadmium yellow and burnt sienna. Black was added to the very dark areas and white was added to the light green to give the highlights. 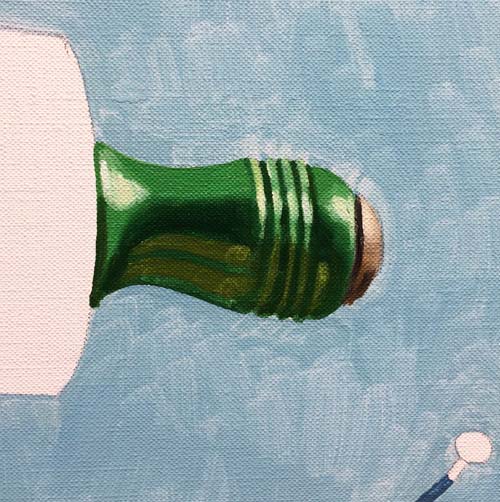 The handle on the right side of the rolling pin is treated the same way, with a little more Permalba white added to show where the sun reflects off of the enameled green handles. 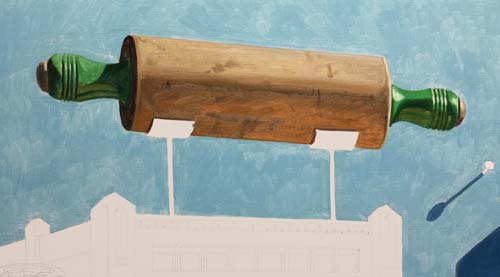 Here is the entire rolling pin. I painted the body of the pin with a mixture of burnt umber, burnt sienna and French ultramarine blue. I added cadmium yellow to the shaded area on the lower area of the rolling pin and added white to the sun struck upper area.  I've painted the simple crude supports of the rolling pin with a very dark mixture of French ultramarine blue, burnt umber and ivory black. They aren't exactly the same size, the right being larger. I may adjust that later or keep it...we'll see. 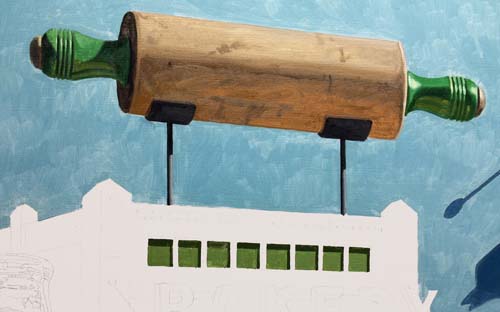 Since I had some green paint mixed, I added some more burnt sienna and yellow and painted the upper windows of the building. 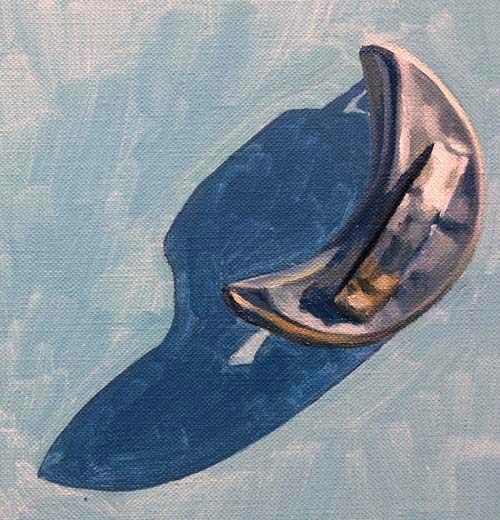 I'm staying up in the sky and rendering the cookie cutters. Here is the moon. 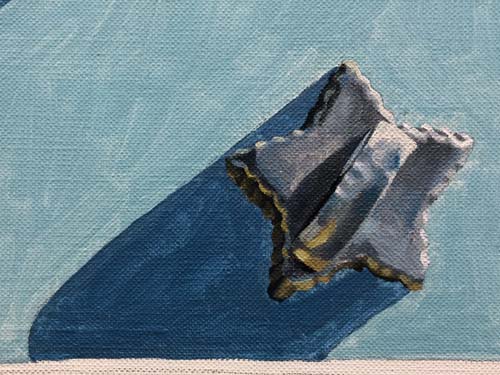 These old cutters are very thin aluminum. The little curved handles have lots of bends and curves in them. 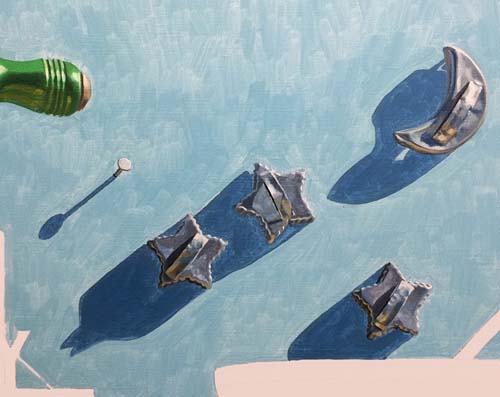 Here are all four cutters. The nail represents the cutter that will be sitting on the street with the cookies and cookie dough. 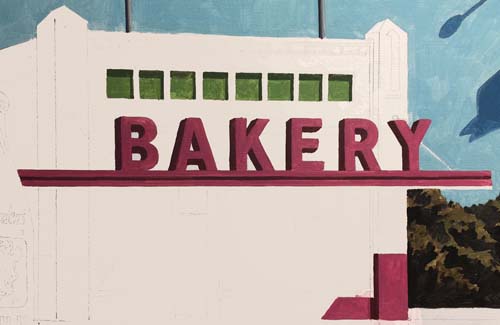 I've chosen a pinkish hue for the bakery sign and building trim. I can't paint all of the pink areas just yet. I need to draw in my baker first. My friend, Toby, will be posing soon. 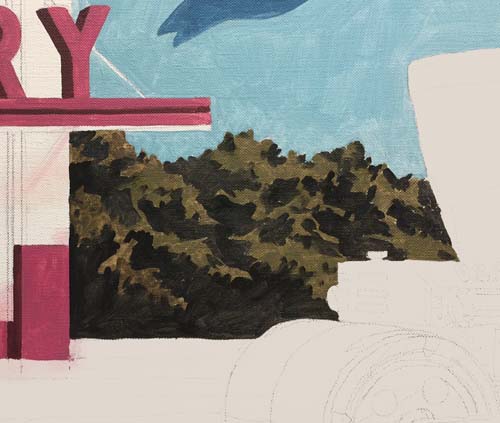 The bushes/trees in the background are roughed in. I may give them a little more detail later. 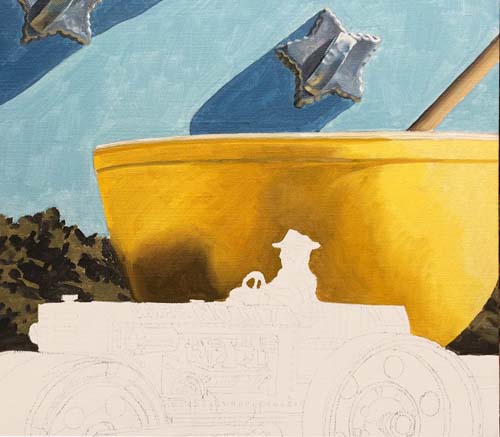 This vintage bowl comes from a 4 bowl set. It not only helps me introduce a needed color into the setting, but it also gives me a chance to show the light passing through opaque glass. 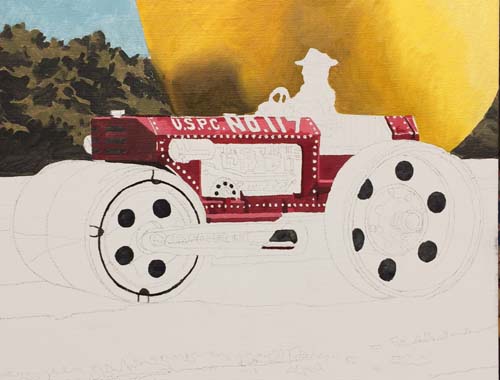 It's time to paint the steam roller. It's a very detailed tin toy and will require a steady hand. I've started by putting in the darkest hue. 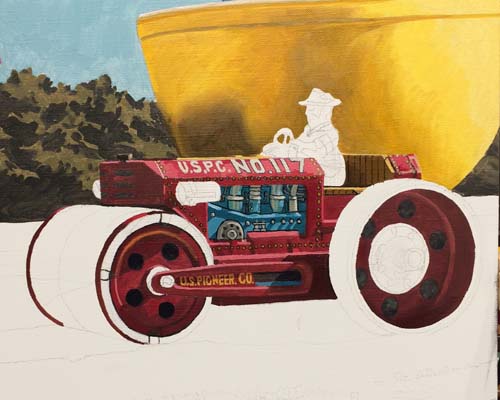 I've applied the reds, a mixture of cadmium red and alizaron crimson, with white and black added to lighten and darken.  Today was model posing day. After some cloudy days with a little rain, today was perfect! The sun was shining and my good buddy and golf partner, Toby, stopped by to pose for "Milk And Cookies." Toby said that he had a baker in the family history. I know he is a master of bar-b-que and a cook (when he isn't working at his day job). So, posing as a baker not only fits him, but the baker's uniform fit him as well. Thanks, Toby! 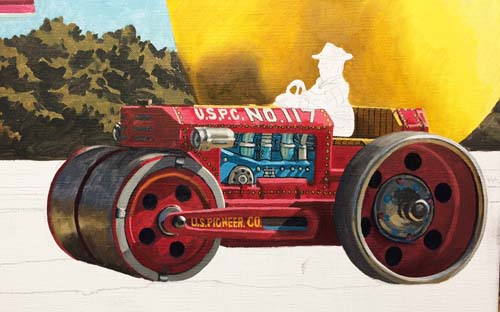 I've continued on with the steam roller, leaving only the 'tin' driver to complete. 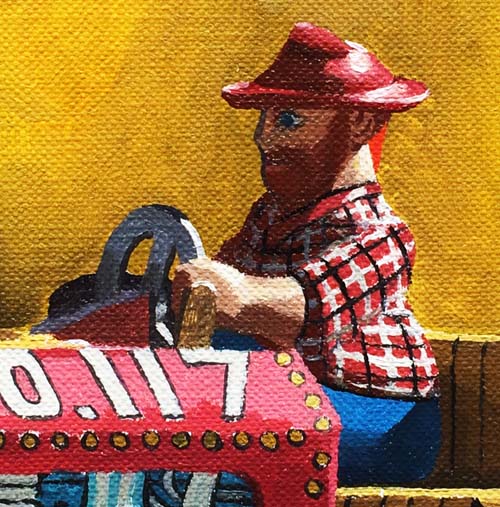 The steam roller driver, like most tin figures is made of two halves. The dark line you see running down the side of his face is the seam between the two halves. 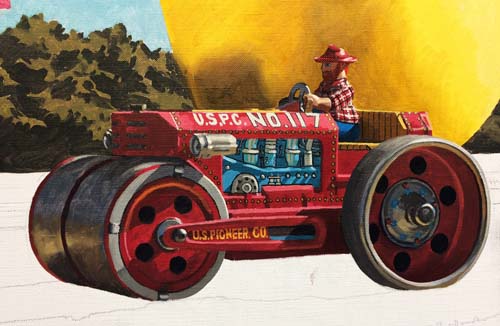 I'll move off the steam roller and move onto painting the baker, standing out in front of his store. 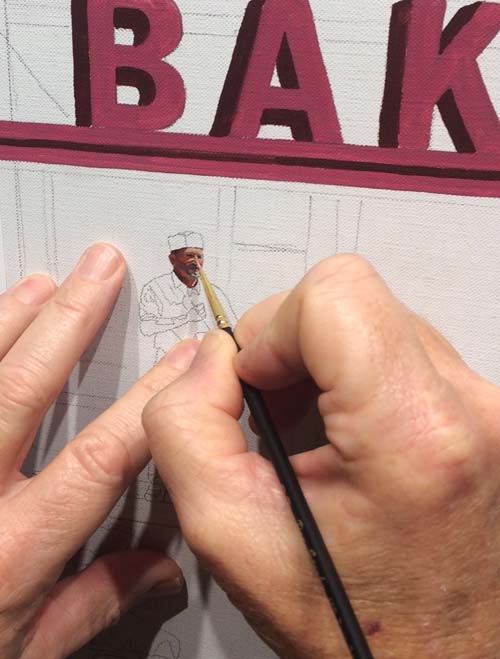 Starting with his face, I'm using two 00 (double ought) sable brushes: one is a 00 round and the other is a 00 bright. As you can see, one slight move off the mark and the features change dramatically. I could just paint all my figures with some generic facial features, but I've always enjoyed documenting my friends, making every image unique. 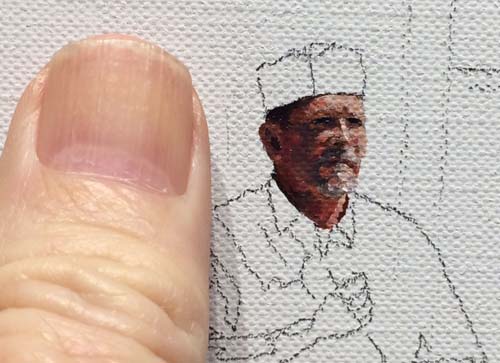 This close-up of my thumb, sitting on the canvas, gives a better idea of how small of an area I am working in. Toby's head is about 1/2" tall, about the size of my thumbnail. 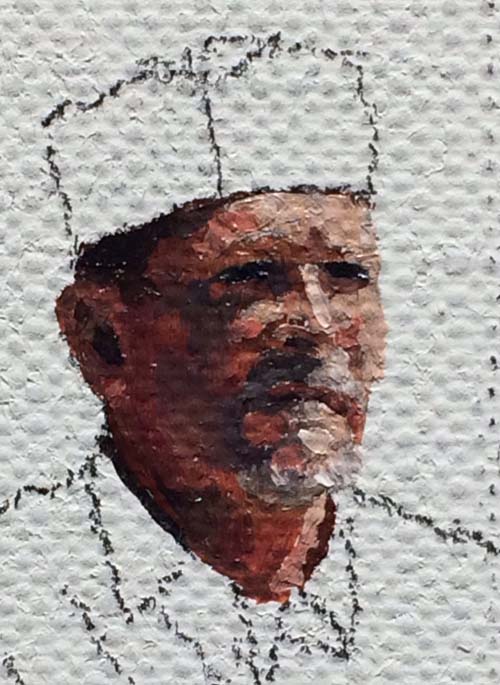 As we zoom in on the portrait, you can see that it looks like a larger portrait on rough canvas. I've applied the paint much thicker than I usually apply in the first layer so that I am able to see more of a final product with my efforts. 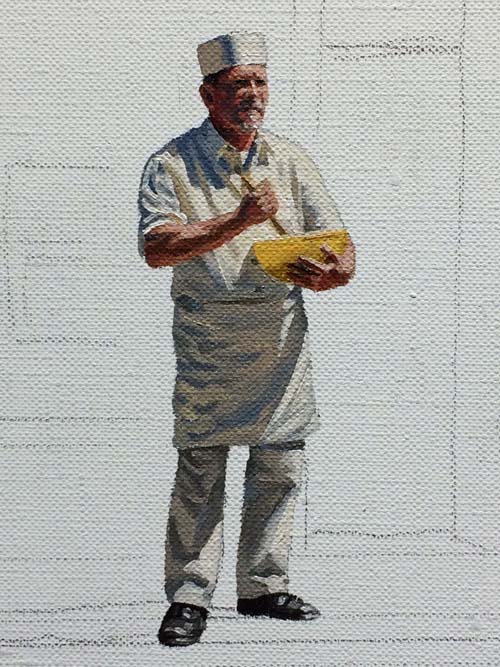 The rest of the baker's uniform is treated as usual, with the oil pigment thinned out. 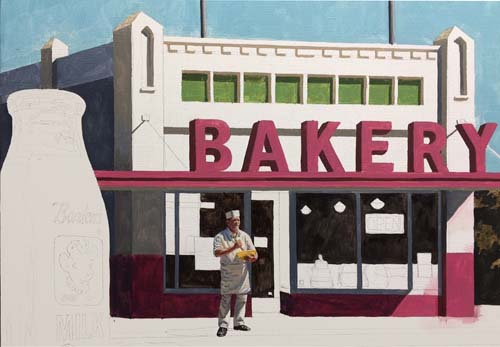 The building is next, adding the shaded part of the building on the upper left and some of the architectural details on the facade. I've also begun to delineate some of the interior detail. 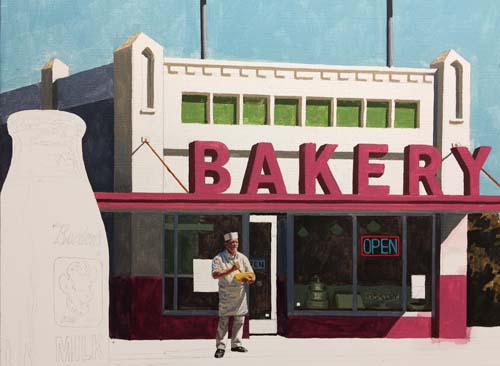
The 'OPEN' sign glows against the dark interior, painted with a mixture of French ultramarine blue, cadmium yellow, burnt umber and ivory black. I've put some bakery goods in the window and tinted everything with some thalo green and burnt umber. 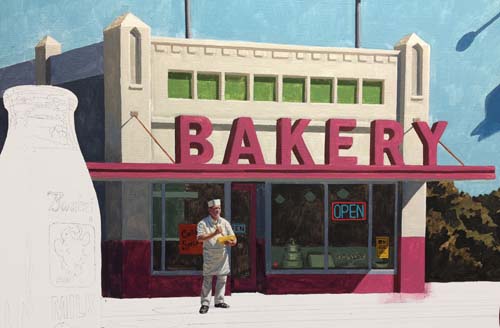 The building is finished for now. I've mixed three values of white for the stucco on the building, using Permalba white, French ultramarine blue, burnt sienna and cadmium yellow. 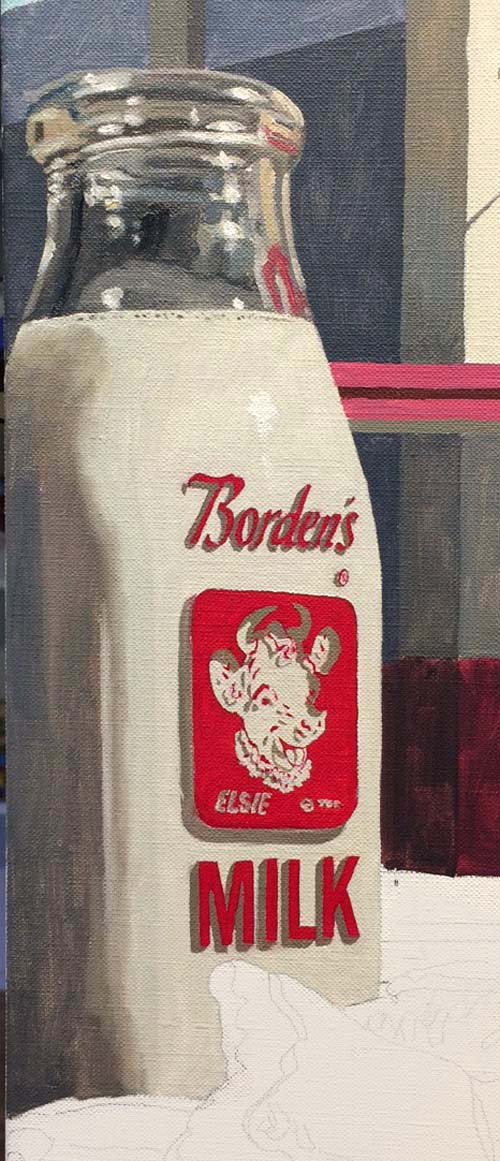 The fun thing about painting a vintage milk bottle is rendering the label that is printed on the glass. It casts a shadow on the milk in the bottle because of the thickness of the glass. I darkened the milk just enough to allow me to put highlights of white on the bottle that are reflections of the sun. 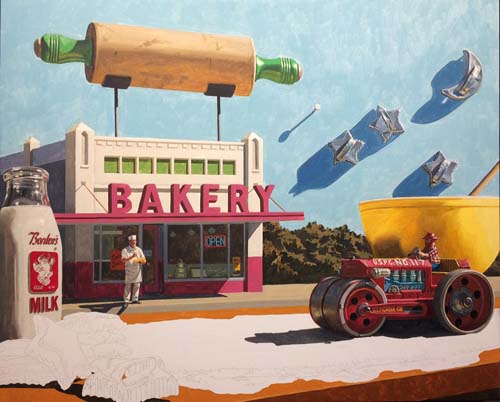 I've decided to establish the ground surfaces, including the sidewalk and curb, and the street. This includes the indication of the cutlery board edge of the street.  The dough that is being rolled out has an edge to it, along with small piles of flour to keep it from sticking to the board/street. 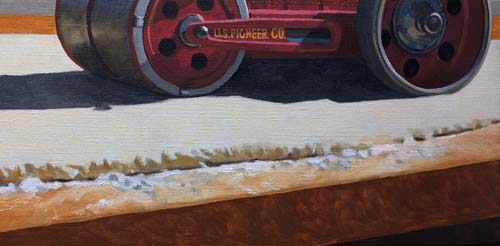 Here is another photo showing some more of the edge of the dough. 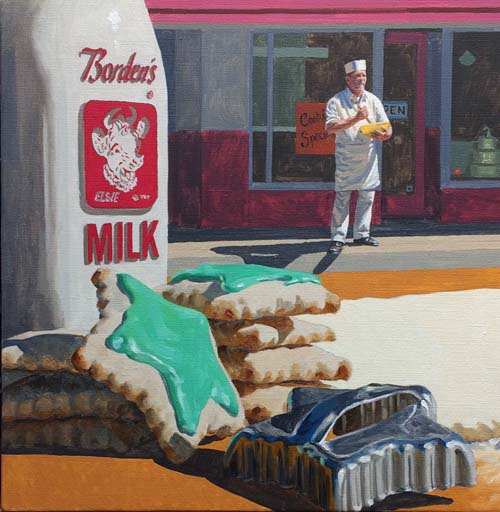 The last grouping of objects is painted...the cookies and the cookie cutter on the street/table.  That brings "Milk And Cookies" to the half way point. Every inch of the canvas has a hue and value placed on it. Now I will evaluated the overall values and hues in the painting and determine where to make my final changes.  By painting the sky as the first element in the final layer of paint, I can base all the other elements color and value on it. I made it a little darker than the first layer of color in order to make the highlights on the cookie cutters stand out.  This close up shows the highlights on the cookie cutters, made more evident by darkening the sky. 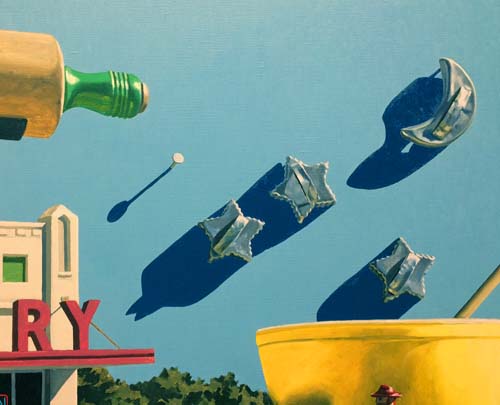 The shadows of the cutters have been darkened to their final value with a mixture of thalo blue, cadmium yellow, burnt sienna and ivory black. 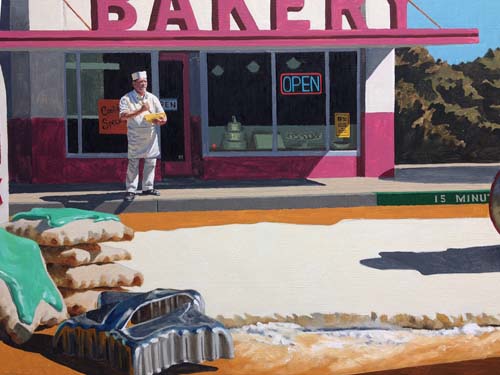 The curb has been darkened substantially and I added a green 15 minute parking section to add some color and interest. 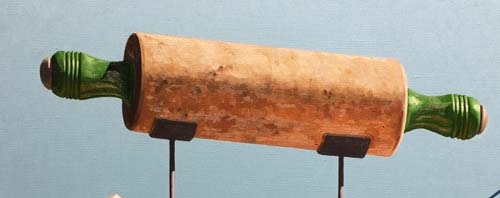 Now that the sky has dried, I'll move back up there and paint the objects that are in the sky. The roller is first and is done. 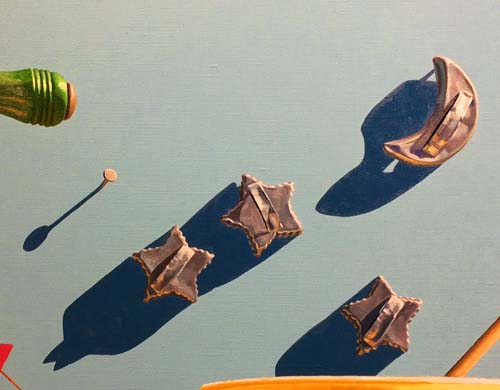 I've continued on to the cookie cutters, detailing them with thicker paint. I made the tin mixture with French ultramarine blue, burnt sienna, white and a little magenta. Some areas also received dashes of thalo blue mixed with burnt sienna and white. The warm reflections on the underside areas had cadmium yellow added to the mix. 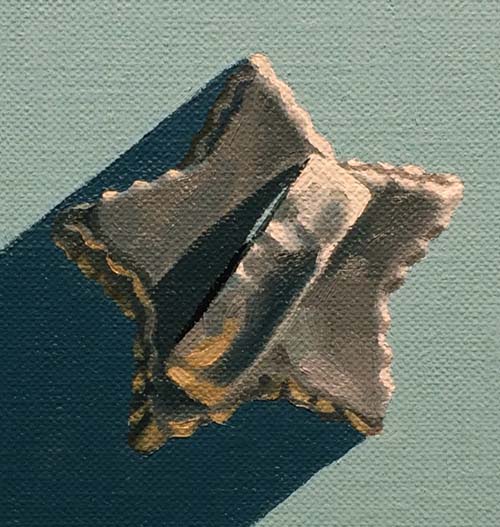 This detail shows the many values of grays, both cool and warm used to give the cutters their volume.  Moving back on to the building, I've mixed a pink color to paint the bakery sign and trim on the building. This photo shows the rich layer of oil that goes down in the final layer. 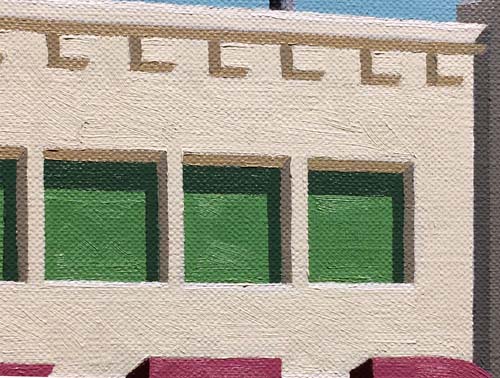 Here's a detail of the finished window areas in the upper portion of the building facade. 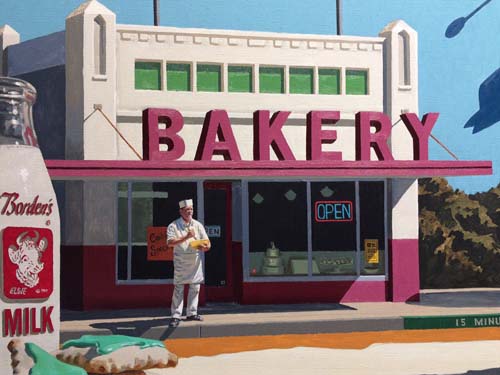 The upper area of the building is finished, along with the pink trim color on the lower part of the building. I'll address the gray shadow areas of the off white portions of the building and the detail in and around the show windows.  The building and the sidewalk are completed. Some of the very dark areas have dried dull and will darken when I give them a coat of varnish when the entire painting is done. 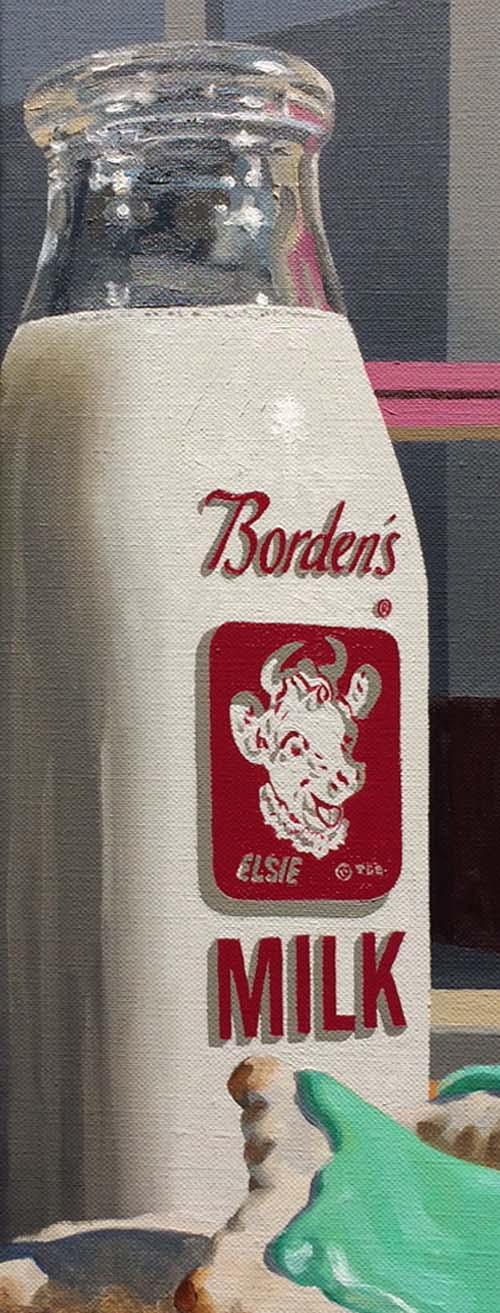 The milk bottle is now sporting its final layer of paint. 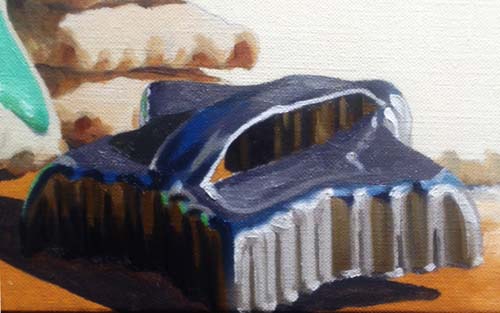 The cookie cutter on the street is painted. Notice the blue tones, reflecting the blue sky and the warm tones reflecting the table top. 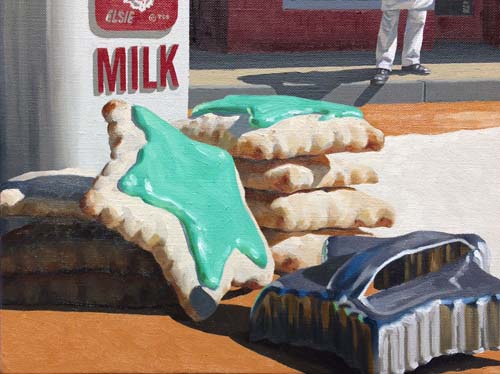 The rest of the cookies is done. Varying shades of warm and cool grays make up the edges of the cookies, reflecting warm light from the table. 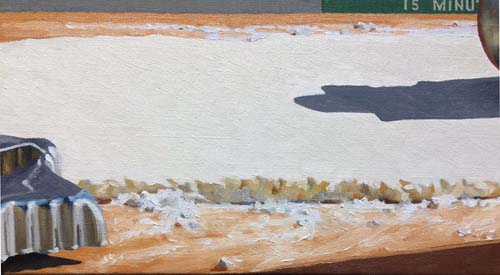 Here's a close look at the edge of the table, with the flour scattered on the tabletop and the warm and cool edge of the rolled out flour. 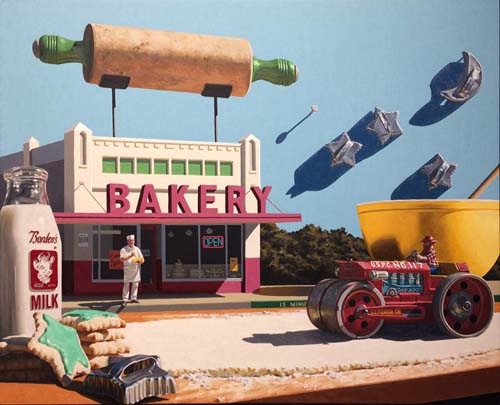 At a glance, the painting looks finished. I need to spend a couple of days laying the final coat of paint on the intricate details of the steam roller, and at least one more day finalizing the baker's outfit and possibly a little tweeking of his flesh tones. 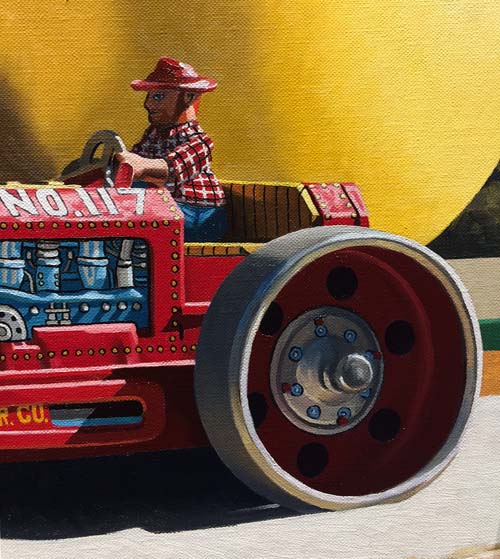 The steam roller took me a couple days longer than I had planned, due to all the detail in the toy. Here are a couple of detail photos.  The roller posed a real study in reflective light. The cool blue shades of gray face the sky, the warmer ones reflect the light coming off the cookie dough. 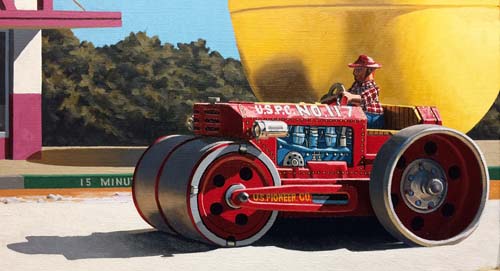 Notice how the cast shadow of the steam roller is very dark under the toy and see how the shadow in the front of the roller gradually gets lighter as it moves away from the roller. Light creeps into shadows when there aren't any walls or objects blocking its path. 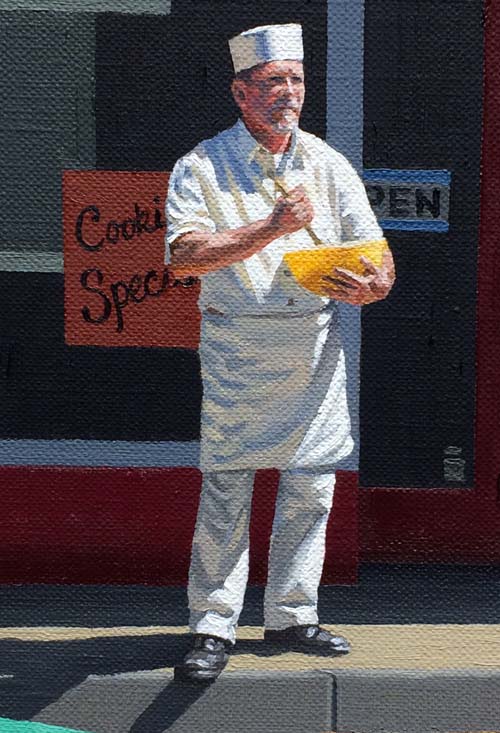 A few thinly painted areas were addressed on Toby, adding some thicker paint to highlighted areas in particular. 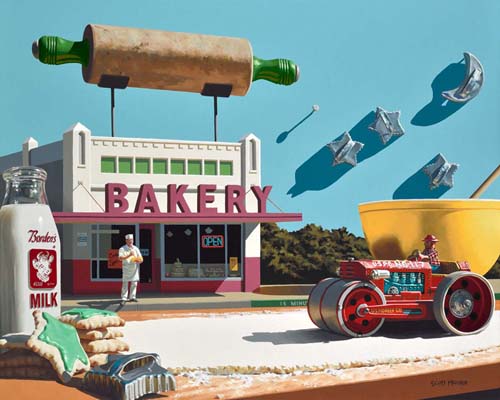 "Milk And Cookies" is finished. I'll give it a week to dry before coating it with a light varnish to bring out the depth in the darker areas. |
|
|
|
|
email:scott@scottmooreart.com |